Master jewelry product photography with an 8-image checklist, lighting techniques, and Shopify specs designed to eliminate buyer objections and boost conversions.
Published:
March 10, 2026
Author:
Yi Cui
Jewelry is bought with the eyes, before the brain. Before a shopper reads a single word of your product description, they have already made a gut decision about whether your piece looks worth the price. Product imagery is the single highest-leverage conversion variable for jewelry sellers, outperforming copy and often outperforming price. Research consistently shows that 67% of online buyers rank image quality as the most important factor in their purchase decision [1], and Baymard Institute's ongoing ecommerce UX research has found that 25% of ecommerce sites still fail to provide product images with sufficient resolution or zoom capability [2]. For jewelry, where tactile experience is impossible, that gap is not just a missed opportunity. It is a direct cause of abandoned carts.
Most product categories are forgiving. A pair of sneakers photographed in decent light on a white background will communicate most of what a buyer needs to know. Jewelry is different. The challenges stack up fast.
Reflective metal surfaces bounce light unpredictably. A ring photographed under a bare bulb will show the ceiling, the photographer's hands, and the camera lens before it shows the ring itself. Gemstones require a specific angle relative to the light source to display their color and brilliance. A ruby photographed under fluorescent light can look brown. A diamond photographed with direct flash can look like a piece of glass. Scale is another problem: a necklace that looks substantial in a product photo may arrive and feel delicate and small, which is one of the leading drivers of jewelry returns. And then there is the challenge of conveying tactile luxury, the weight of a gold chain, the smoothness of a polished bezel, through a flat image on a screen.
Here is the contrarian insight most photography guides miss: more images do not automatically mean better conversion. For jewelry, image quality and sequence matter more than raw count. A single, perfectly lit macro shot of a clasp mechanism, sharp enough to show the spring tension and the hallmark stamp, can do more conversion work than five mediocre lifestyle shots. Research on ecommerce product pages suggests that image fatigue is real: shoppers who encounter large galleries of inconsistent or redundant images tend to disengage rather than build confidence [2]. The goal is not to fill a gallery. The goal is to answer every visual objection a buyer might have, in the right order, with the fewest images necessary to do so.
In our experience at Branvas working with early-stage jewelry brand founders, the most common mistake is not the number of photos. It is the missing "trust shot" that would have answered the buyer's last objection before checkout. The clasp photo. The scale reference. The back of the pendant. These are the images that close sales, and they are almost always the ones that get skipped.

Every jewelry SKU you list should have at minimum these eight shots. Together, they answer every visual question a buyer has, build trust, and sell the aspiration. Here is each one in detail.
1. Hero Shot
Purpose: Primary listing image. The first thing a shopper sees in search results, collection pages, and social ads.
What to show: The piece front-facing, centered, on a pure white or very light neutral background. No props, no shadows, no distractions. The jewelry should fill roughly 85% of the frame.
Why it converts: This is your catalog shot. It sets the standard for perceived quality. Shopify recommends 2048 x 2048 pixels for this image specifically because it enables their built-in zoom feature, which Baymard Institute research identifies as a critical trust element for small, detailed products [2] [3]. A hero shot that looks sharp at 2x zoom tells the buyer you have nothing to hide.
Practical tip: Use a macro or short telephoto lens (85mm to 105mm equivalent). Shoot at f/8 to f/11 for maximum depth of field. Use a tripod. Clean the piece with a microfiber cloth immediately before shooting.
2. Angle Shot
Purpose: Show depth, dimensionality, and the three-dimensional structure of the piece.
What to show: A side or 3/4 angle that reveals the profile of the setting, the thickness of the band, the depth of a stone's setting, or the construction of a link chain. For rings, a 45-degree side angle is essential. For necklaces, a slight overhead angle showing the chain drape works well.
Why it converts: Flat front-facing shots can make a piece look two-dimensional. The angle shot gives the buyer spatial understanding. They can now imagine the piece on their body, not just on a screen. This is particularly important for rings and cuffs where band thickness directly affects comfort and perceived value.
Practical tip: Rotate the piece rather than moving your camera. This keeps your frame consistent across SKUs and reduces editing time.
3. Macro / Detail Shot
Purpose: Demonstrate quality, craftsmanship, and material authenticity.
What to show: An extreme close-up of the most distinctive detail: the facets of a center stone, the texture of a hammered metal surface, an engraved pattern, the prong setting, or the finish on a bezel. This shot should reveal detail that is invisible at normal viewing distance.
Why it converts: Perceived quality is built at the micro level. A buyer who can see the precision of a prong setting or the clarity of a stone facet at 2x zoom will assign a higher value to the piece. This shot is also the one most likely to be shared on social media, because it looks like art. For sellers on Shopify, this is the image that makes the zoom feature earn its keep [3].
Practical tip: Use a true macro lens or a close-up diopter filter. Shoot at f/11 to f/16 for maximum sharpness across the detail area. Use a focus rail if available. Diffused light from a single direction, with a white reflector card on the opposite side, works best for gemstones.
4. Scale Shot (Trust Shot)
Purpose: Eliminate size anxiety, which is the number one reason for jewelry returns.
What to show: The piece next to a universally understood reference object: a ruler, a standard US quarter, or a hand with neutral nail polish. Alternatively, include a clean graphic overlay showing exact dimensions in millimeters. For rings, show the band width and stone diameter. For necklaces, show the chain length in context.
Why it converts: "It was smaller than I thought" is the most common complaint in jewelry return reviews. This shot costs almost nothing to produce and can eliminate a significant percentage of returns and negative reviews. It also signals transparency, which builds trust before the buyer has even read your size guide.
Practical tip: If using a hand, use a neutral or bare nail. Avoid long nails or nail art that distracts from the jewelry. A simple flat lay with a ruler on a white background is clean, professional, and universally readable.
5. Clasp / Back / Mechanism Shot (Trust Shot)
Purpose: Signal craftsmanship, authenticity, and quality construction.
What to show: The back of the pendant, the clasp mechanism open and closed, the lobster claw or toggle closure, the hallmark stamp (925, 14K, 18K), the jump ring quality, the earring post and butterfly back. For rings, show the inside of the band including any stamps or engravings.
Why it converts: Buyers who are serious about purchasing will look for these details. The hallmark stamp is a proof-of-material signal. The clasp quality tells them whether the piece will last. The back of a setting tells them whether the stone is secure. Showing these details proactively answers the "is this real?" question before it becomes a reason not to buy. It is also a strong differentiator from lower-quality competitors who hide their backs.
Practical tip: This shot requires careful lighting to avoid glare on polished metal. Use a diffused light source at a low angle (30 to 45 degrees from the surface) and a white reflector card on the opposite side to fill in shadows. A small piece of matte black card placed just outside the frame can add definition to the edges of highly polished pieces.
6. On-Body / Worn Shot
Purpose: Show scale, wearability, and how the piece looks in real life on a real person.
What to show: The piece worn on a real wrist, neck, ear, or finger. Use a model whose skin tone complements the metal (or ideally, shoot on multiple skin tones). The background should be contextual but clean: a simple white shirt, a neutral sweater, bare skin. The focus should be on the jewelry, not the model.
Why it converts: This is the "try-on" shot. It answers the question every buyer is asking: "What will this look like on me?" Research from ecommerce studies suggests that product pages combining studio shots with on-body imagery see measurably higher conversion rates than those using studio shots alone [4]. For jewelry specifically, the on-body shot also communicates scale more naturally than a ruler, because the human body is the most universal reference object.
Practical tip: For sellers without access to models, a clean hand shot (your own or a friend's) on a white or neutral background is a professional and effective alternative. Shoot in natural light near a window. Keep the hand relaxed and natural. Avoid rings on adjacent fingers that compete for attention.
7. Lifestyle / Context Shot
Purpose: Sell the aspiration and the identity the buyer wants to project.
What to show: The piece styled in a scene that reflects your brand world: a vanity table with morning light, a beach with soft sand, a café table with a coffee cup, a dressing table with a mirror. The scene should feel aspirational but attainable. The jewelry is the hero, but the scene provides emotional context.
Why it converts: People do not buy jewelry. They buy the version of themselves they imagine wearing it. The lifestyle shot is where you sell that story. According to ecommerce research, product pages that combine studio and lifestyle photography see an average 30% uplift in conversion rates compared to studio-only galleries [4]. For jewelry brands targeting a specific aesthetic (minimalist, bohemian, luxury, coastal), the lifestyle shot is where that aesthetic is communicated most powerfully.
Practical tip: Keep props minimal and intentional. A sprig of eucalyptus, a linen cloth, a marble surface: these add texture without competing. Avoid cluttered scenes. The buyer's eye should land on the jewelry within one second of viewing the image.
8. Packaging / Unboxing Shot
Purpose: Sell the gifting experience and communicate brand premium.
What to show: The piece in its packaging: the box open, the pouch with the drawstring, the tissue paper, the ribbon, the branded card. Show the full unboxing moment. If your packaging is distinctive, show it closed and then open.
Why it converts: A significant percentage of jewelry purchases are gifts. The packaging shot tells the gift-buyer that their recipient will have a premium unboxing experience. It also communicates brand investment: a seller who has invested in beautiful packaging has invested in the overall product experience. For Branvas brand founders, this is where your custom packaging does double duty, both as a physical product enhancement and as a conversion asset in your listing gallery.
Practical tip: Shoot on a styled surface (marble, linen, wood grain) with soft natural light. Include the jewelry piece itself in the shot, either inside the open box or placed beside it. This connects the packaging to the product and reinforces the full value proposition.
| # | Shot Type | Background | Key Purpose | Priority |
|---|---|---|---|---|
| 1 | Hero | White/neutral | Primary listing image | Must-have |
| 2 | Angle | White/neutral | Show depth and dimension | Must-have |
| 3 | Macro/Detail | White/neutral or dark | Show quality and texture | Must-have |
| 4 | Scale (Trust) | White/neutral | Eliminate size anxiety | Must-have |
| 5 | Clasp/Back (Trust) | White/neutral | Signal craftsmanship | Must-have |
| 6 | On-Body/Worn | Contextual | Show fit and wearability | Highly recommended |
| 7 | Lifestyle | Styled scene | Sell aspiration | Highly recommended |
| 8 | Packaging | Styled scene | Sell brand and gift appeal | Recommended |

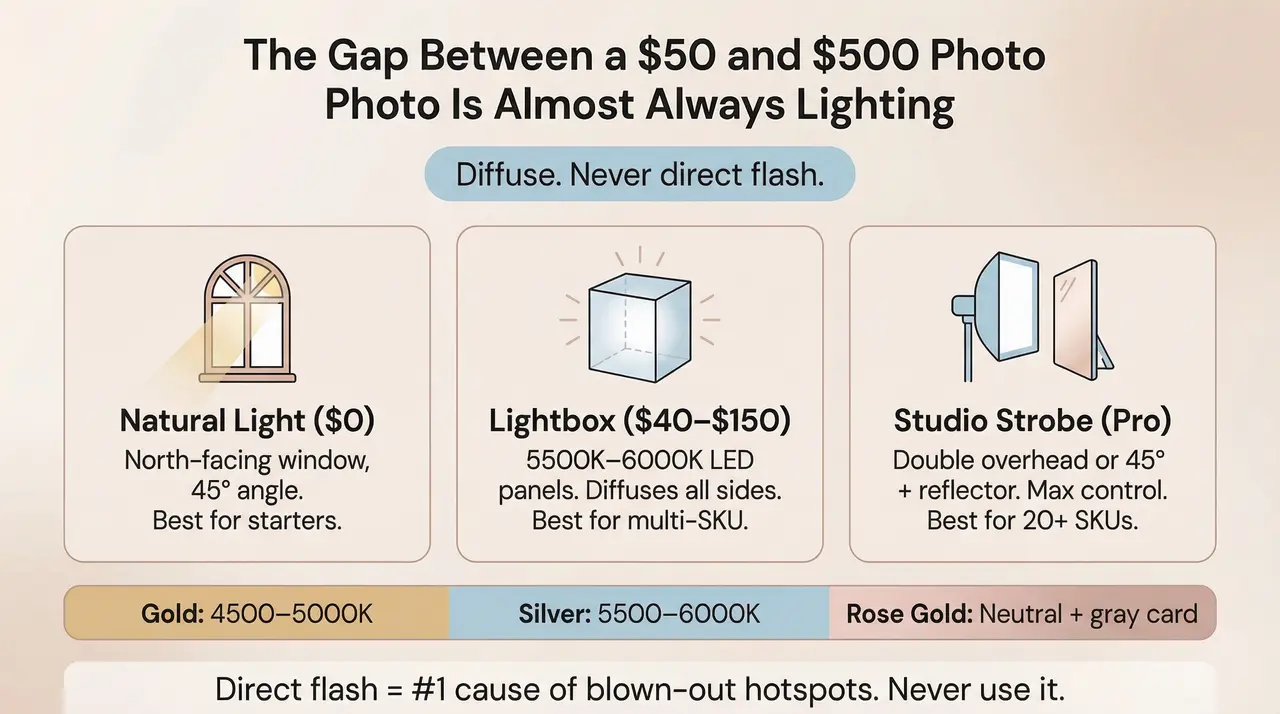
Lighting is where most early-stage jewelry sellers lose the most ground. The difference between a $50 product photo and a $500 product photo is almost always lighting, not the camera.
Natural light is the most accessible starting point. A north-facing window (in the northern hemisphere) provides consistent, indirect light that does not shift in color temperature throughout the day. Position your setup 2 to 3 feet from the window, with the window at a 45-degree angle to the piece. Turn off all other light sources in the room: overhead fluorescents and warm incandescent bulbs will contaminate your color temperature and make white balance correction in post-production much harder.
Worked example: A founder selling gold-plated earrings uses a $40 portable lightbox near a north-facing window. The lightbox diffuses the window light evenly across all sides of the piece, eliminating the harsh shadow that would appear with direct window light. The result is a clean, evenly lit hero shot with no hotspots. The common mistake in this setup is leaving the room's overhead light on, which adds a warm color cast that makes gold look orange and silver look yellow.
A lightbox (also called a light tent) is the most practical upgrade for a seller shooting multiple SKUs. A lightbox is a translucent white enclosure that diffuses light from all sides simultaneously, minimizing reflections and harsh shadows on polished surfaces. For jewelry, a lightbox with LED panels rated at 5500K to 6000K (daylight equivalent) will give you consistent, neutral light that renders metals and gemstones accurately. Lightboxes in the $40 to $150 range are adequate for most early-stage operations [5].
Studio strobes (or continuous LED panels with softboxes) give you the most control. The two most effective setups for jewelry are the double overhead setup, where two light sources are positioned above and slightly to each side of the piece, and the 45-degree setup, where a single light is positioned at a 45-degree angle with a V-flat or foam board reflector on the opposite side to fill shadows [5]. Studio lighting is worth the investment when you are shooting 20 or more SKUs per session.
Direct on-camera flash is the single most damaging thing you can do to a jewelry photograph. It creates a single, harsh point of light that bounces directly off polished metal surfaces, producing a blown-out white hotspot that obscures detail and makes the piece look cheap. It also casts hard, unflattering shadows. The fix is simple: never use direct flash for jewelry. If you must use flash, bounce it off a white ceiling or use a diffuser attachment. Better still, eliminate flash entirely and use the light sources described above [6].
This is where we see the most costly mistakes. Gold, silver, and rose gold each require a different white balance approach to render accurately.
Gold looks best under slightly warm light (around 4500K to 5000K). Under cool daylight (6500K), gold can look pale and washed out. Under very warm incandescent light (2700K), it can look orange and cheap. The sweet spot is a neutral-to-warm daylight source with a custom white balance set using a gray card.
Silver and white gold render most accurately under neutral to cool daylight (5500K to 6000K). Under warm light, silver takes on a yellow cast that can make it look like low-grade metal.
Rose gold is the most challenging. It requires a neutral light source and precise white balance calibration. Even small errors in white balance will shift rose gold toward either orange (too warm) or pink-gray (too cool).
The professional solution is to shoot in RAW format and set a custom white balance using an 18% gray card before each session. This gives you a neutral reference point that you can apply in post-production to all images from that session [6].
We often see founders spend hours on background choices but neglect white balance, then wonder why their gold pieces look brassy and dull online. A five-minute white balance calibration at the start of a shoot will save hours of post-production correction.
A white foam board reflector card (available for under $5 at any art supply store) is one of the most powerful tools in jewelry photography. Placed on the shadow side of the piece, it bounces light back into the concave surfaces that would otherwise go dark: the inside of a ring band, the underside of a bezel, the interior of a link chain. This fill light is what separates flat, one-dimensional jewelry photos from images that look three-dimensional and premium.
For highly polished pieces that show strong reflections, a small piece of matte black card placed just outside the frame (but visible to the piece's surface) can add definition to the edges by creating a controlled dark reflection. This technique, borrowed from commercial product photography, makes polished metal look intentional rather than overexposed.
Getting the creative right is only half the job. If your images are the wrong size, wrong format, or too heavy, they will underperform regardless of how well they are shot.
Shopify's official guidance recommends 2048 x 2048 pixels for square product images [3]. This is the sweet spot: high enough resolution to enable the built-in zoom feature (which requires a minimum of 800 x 800 pixels), while not so large that it creates unnecessary file weight. Shopify accepts images up to 5000 x 5000 pixels with a maximum file size of 20 MB, but uploading at maximum resolution is rarely necessary and can slow your store's load time [3].
For the zoom feature to work properly, your image must be at least 800 x 800 pixels on the shortest side. For jewelry, where buyers want to zoom in on stone quality and metal finish, shooting at 2048 x 2048 and enabling zoom is a direct conversion lever.
Shopify's official guidance states that PNG is the best file type for most product images, followed by JPEG [3]. For jewelry specifically:
Shopify recommends keeping product photo file sizes to approximately 200 KB or less for optimal page load speed [7]. Larger files contribute to slower Largest Contentful Paint (LCP) scores, which is a Core Web Vital that directly affects both Google search rankings and user experience. On mobile connections, a 2 MB product image can add 2 to 3 seconds of load time, which research consistently shows increases bounce rates.
The practical workflow: shoot at full resolution, then compress images using a tool like Squoosh, TinyPNG, or Shopify's built-in image optimizer before uploading. Target 200 KB to 400 KB per image for the best balance of quality and speed.
Every product image on Shopify should have descriptive alt text that includes your primary keyword naturally. For a jewelry listing, alt text like "14K gold hoop earrings with diamond accent, front view" serves both accessibility and SEO purposes. Include the metal type, stone type (if applicable), and the shot type. Avoid keyword stuffing: "gold earrings jewelry product photography" is not alt text, it is a keyword list. Write for the screen reader, not the algorithm, and the SEO benefit will follow.
Over 70% of ecommerce traffic now comes from mobile devices [8]. This has direct implications for how you crop and compose your jewelry images. On a mobile screen, a 2048 x 2048 pixel image will be rendered at roughly 375 to 414 pixels wide. Details that look sharp on desktop can become indistinguishable at mobile scale. The implication: compose your hero shot so that the most important detail (the stone, the clasp, the key design element) is centered and large enough to read clearly at thumbnail size. Avoid wide shots with the piece floating in a large expanse of white background: on mobile, the piece will be tiny.
Square (1:1) images are the most mobile-friendly format for product listings, as they maintain consistent proportions across all screen sizes and do not require horizontal scrolling [3].

At Branvas, we guide every new brand founder through what we call the Branvas Content Library System (BCLS), a repeatable, scalable content production model designed to make sure you never have to start from zero when launching a new product or collection.
Most early-stage sellers approach photography reactively: they shoot when they launch, then scramble for new content when a campaign or season comes around. The BCLS inverts that. It treats your content library as a living asset that compounds in value over time, with a clear production cadence and a data-driven pruning process.
At launch, shoot all 8 checklist shots for every SKU. These are your evergreen assets. They do not change unless the product changes. They answer every visual question a buyer has, and they are the foundation on which every future campaign is built. Do not launch a product without completing this phase.
Every 60 to 90 days, add 2 to 3 new lifestyle or editorial shots to refresh your product listings for seasonal relevance. Valentine's Day, holiday gifting season, summer, back-to-school: each of these moments has a distinct visual language, and your listings should speak it. You never reshoot the core 8. You only add on top. This keeps your production costs low while keeping your listings fresh and algorithmically relevant.
Actively solicit and curate user-generated content: customer photos, unboxing videos, styled shots from real buyers. Integrate UGC into your listing gallery as supplementary images, typically in positions 7 through 10 or beyond. UGC serves a dual purpose: it provides social proof (real people, real wrists, real necks) and it reduces your content production burden over time. A simple post-purchase email asking customers to share a photo, with a small incentive, can generate a steady stream of authentic content that no studio shoot can replicate.
Quarterly, use Shopify Analytics, Google Analytics, or a heatmap tool like Hotjar to identify which images in your gallery are getting the most engagement, which are being skipped, and which correlate with add-to-cart events. Prune underperformers. Replace them with new shots informed by what the data tells you buyers actually want to see. This is the phase that separates brands that grow from brands that plateau.
| Phase | Frequency | Action | Output |
|---|---|---|---|
| 1: Core Assets | At launch | Shoot all 8 checklist shots per SKU | Evergreen product gallery |
| 2: Campaign Overlays | Every 60 to 90 days | Add 2 to 3 seasonal lifestyle shots | Refreshed listings |
| 3: UGC Integration | Ongoing | Collect and curate customer photos | Social proof gallery images |
| 4: Performance Audit | Quarterly | Analyze image engagement data | Pruned, optimized gallery |
If you are launching a new jewelry line and want to hit the ground running with professional packaging and product assets from day one, explore how Branvas works. We handle the product, the branding, and the fulfillment so you can focus on content and community.

The appeal of 3D renders and digital mockups is obvious: no photographer, no model, no studio. You can generate product images before the physical product even exists. For jewelry, the reality is more complicated.
Digital mockups and 3D renders have a legitimate role in the early stages of a jewelry brand. For pre-launch landing pages, social ads testing concept viability before production, and internal design review, renders are fast and cost-effective. They can also be useful for showing color variants (yellow gold, white gold, rose gold) without shooting each variant separately.
For live product listings, real photography almost always outperforms renders for jewelry. The reason is what researchers call the authenticity signal: buyers want to know what the piece actually looks like, not an idealized version of it. A 3D render, no matter how photorealistic, has a subtle visual quality that trained eyes (and increasingly, untrained ones) recognize as synthetic. It raises the question: "Why didn't they just photograph it?"
More practically, renders struggle with the specific optical properties that make jewelry compelling: the way light refracts through a faceted stone, the micro-texture of a brushed metal surface, the warmth of real gold under natural light. These are the details that trigger the emotional response that drives purchase. Renders flatten them.
A well-lit real photo taken on a $200 mirrorless camera will almost always outconvert a $500 professional render for jewelry. The reason is the authenticity signal: buyers want to know what it actually looks like, not an idealized version.
Virtual try-on technology for jewelry has improved significantly. Shopify supports AR product viewing through its native 3D model feature, and third-party apps like MirrAR, Camweara, and JwelAR (available on the Shopify App Store) allow customers to virtually try on rings, earrings, and necklaces using their device camera [9].
These tools are worth exploring as supplementary experiences, particularly for rings and earrings where fit and scale are significant purchase barriers. However, they work best as additions to, not replacements for, a strong core photography gallery. The AR experience requires a 3D model of the product, which adds production cost and complexity. For most early-stage jewelry brands, the highest ROI move is still to invest in great real photography first, and layer in AR capabilities later.

The five most important shots for any jewelry listing are the hero shot, the macro/detail shot, the scale shot, the clasp/back shot, and the on-body/worn shot. The hero shot is your primary listing image and the first thing a buyer sees in search results. The macro shot builds perceived quality by showing craftsmanship up close. The scale shot eliminates the most common reason for returns: "it was smaller than I thought." The clasp/back shot answers authenticity questions and signals quality construction. The on-body shot shows the buyer what the piece will actually look like when worn. If you can only shoot five images per SKU, these are the five. The lifestyle and packaging shots add aspiration and brand premium, but the first five are the conversion foundation.
Shopify officially recommends 2048 x 2048 pixels for square product images [3]. This resolution enables the built-in zoom feature, which requires a minimum of 800 x 800 pixels on the shortest side, while keeping file sizes manageable. Shopify accepts images up to 5000 x 5000 pixels and 20 MB, but uploading at that resolution is rarely necessary and can slow your store's load time. For file format, Shopify recommends PNG for most product images, followed by JPEG. Shopify's CDN automatically converts images to WebP for browsers that support it, so you do not need to manually convert. Keep your file sizes under 200 KB after compression for optimal page speed, which affects both user experience and Google search rankings.
You do not need a professional model, but you do need at least one on-body shot per SKU. The on-body shot is one of the most effective conversion drivers in a jewelry gallery because it answers the buyer's most fundamental question: "What will this look like on me?" A clean hand shot (your own or a friend's) on a neutral background, photographed in good natural light, is a professional and effective alternative to a full model shoot. For necklaces and earrings, a neck or ear shot on a real person is similarly achievable without a professional model. What matters is that the shot is clean, well-lit, and focused on the jewelry rather than the person wearing it. For influencers and creators launching jewelry brands, on-body shots are particularly powerful because they can feature the founder themselves, which adds authenticity and personal brand connection.
Glare on shiny jewelry is caused by a direct, undiffused light source reflecting off the polished metal surface. The solution is to replace direct light with diffused light. Use a lightbox, a softbox, or a window covered with a thin white diffusion material (tracing paper or a white shower curtain work well). Position your light source at a 45-degree angle to the piece rather than directly overhead or head-on. Add a white foam board reflector card on the opposite side of the light source to fill in shadows without adding a second direct light. For highly polished pieces, a small piece of matte black card placed just outside the frame can add edge definition by creating a controlled dark reflection. Shoot at a small aperture (f/8 to f/11) for maximum depth of field. If glare persists in post-production, it can be reduced in Lightroom or Photoshop using the Highlights slider and targeted dodging and burning, but the goal is to minimize it in-camera [5] [6].
Product shots (hero, angle, macro, scale, clasp) are studio-style images on clean, neutral backgrounds. Their job is to communicate the product accurately and build trust. Lifestyle shots are styled scenes that show the jewelry in context: worn at a café, displayed on a vanity, paired with an outfit. Their job is to sell the aspiration and the identity the buyer wants to project. You need both, and they serve different stages of the buyer journey. Product shots convert buyers who are already considering a purchase and need to verify quality and fit. Lifestyle shots attract buyers who are browsing and need to be emotionally engaged before they will consider a purchase. Research suggests that product pages combining both types see significantly higher conversion rates than those using either type alone [4]. For ecommerce sellers and boutique owners on Shopify, the recommended approach is to lead with product shots in gallery positions 1 through 5, then add lifestyle shots in positions 6 and beyond.
For a jewelry brand selling online, your product photography is not a marketing asset. It is your storefront, your sales floor, and your customer service team, all in one. It answers questions before they are asked, builds trust before it is earned, and sells the aspiration before the buyer has even decided they want to buy.
The 8-image checklist in this article gives you a complete system for every SKU. The BCLS gives you a production cadence that scales with your brand. The lighting and technical guidance gives you the tools to execute both without a professional studio budget.
The brands that win in jewelry ecommerce are not always the ones with the best products. They are the ones whose products look the best online.
Ready to launch a jewelry brand without worrying about product sourcing, packaging, or fulfillment?
Branvas is the Brand-as-a-Service platform built for jewelry founders, influencers, and ecommerce sellers who want to move fast and look premium from day one.
See how Branvas works, or browse the product catalog to find your first collection.
[1] Product Photography Statistics By Generation And Facts (2025). ElectroIQ, 2025
[2] Can Users Actually See Your Products? The Case for Sufficient Image Resolution. Baymard Institute, 2025
[3] Product media types. Shopify Help Center. Shopify, 2025
[4] Lifestyle vs. Studio Product Photography: Which Drives More Conversions?. Skywall Photography, 2024
[5] Jewelry photography lighting: Guide to setup and what to use. COLBOR Light, 2023
[6] How to Photograph Gems and Jewelry. Gemological Institute of America (GIA), Robert Weldon and Denise Conrad, 2015
[7] Taking product photographs. Shopify Help Center. Shopify, 2025
[8] Mobile eCommerce Stats in 2025: What Percentage of eCommerce Sales Are on Mobile Devices?. OuterBox, updated September 2025
[9] Virtual Try-On: Transforming Jewelry Shopping with AR Technology. MirrAR, 2024