Master jewelry photography for ecommerce with a DIY lighting setup, styling rules, step-by-step editing workflow, and AI-generated imagery alternatives to boost conversions.
Published:
May 9, 2026
Author:
Yi Cui
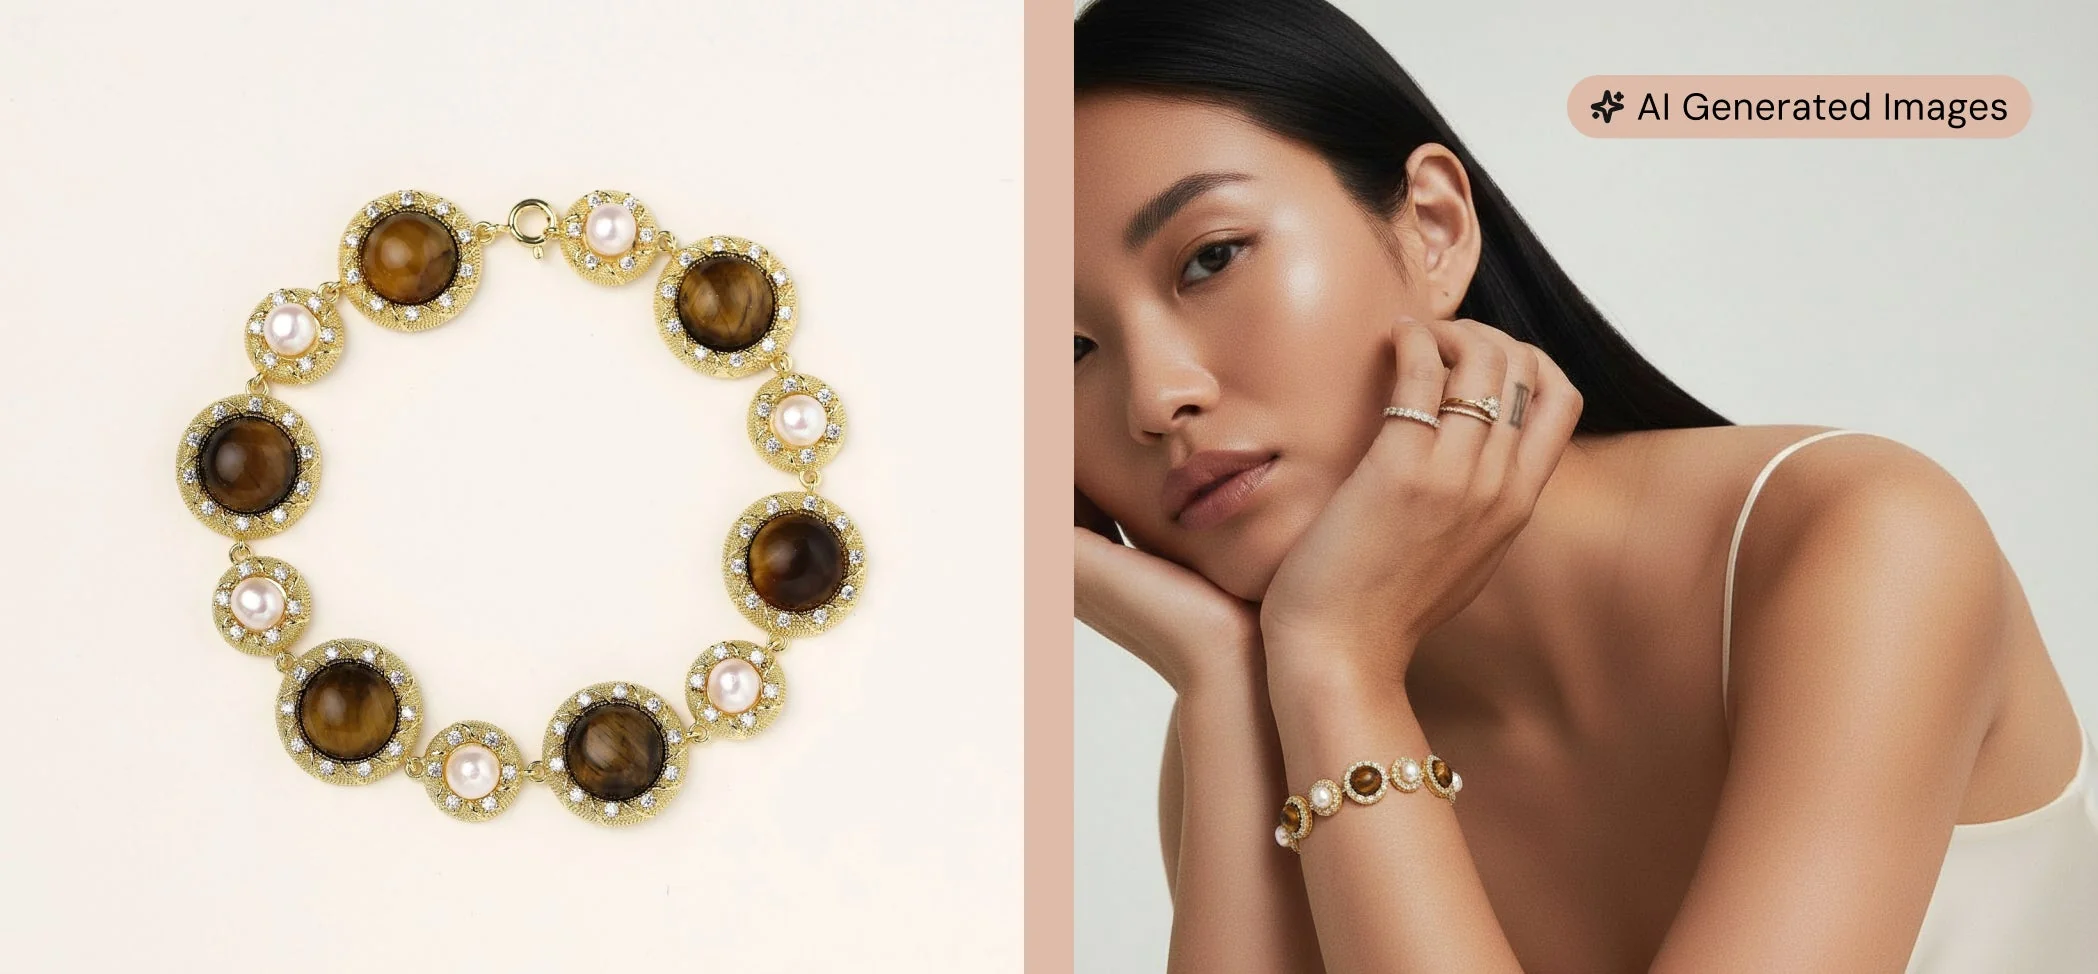
Bad jewelry photography costs more sales than bad pricing. The difference between a $30 earring looking cheap vs. premium comes down to three lighting principles and one background rule.
Jewelry is one of the hardest product categories to photograph. The highly reflective surfaces act like tiny mirrors, capturing every stray light source and shadow in the room. The scale requires macro precision, where a millimeter of missed focus ruins the shot. And the intricate texture details, from the facets of a gemstone to the links of a chain, demand perfect clarity to convey value. When these elements are mishandled, even the most exquisite pieces look flat, dull, and inexpensive.
In this guide, you will learn exactly how to master jewelry photography for your ecommerce store. We cover the essential DIY setup, the exact lighting techniques needed to eliminate glare, and the styling rules that make products pop. You will also get a step-by-step editing workflow and, near the end, a look at how AI-generated imagery is changing the game for brands that need professional results without the studio overhead.
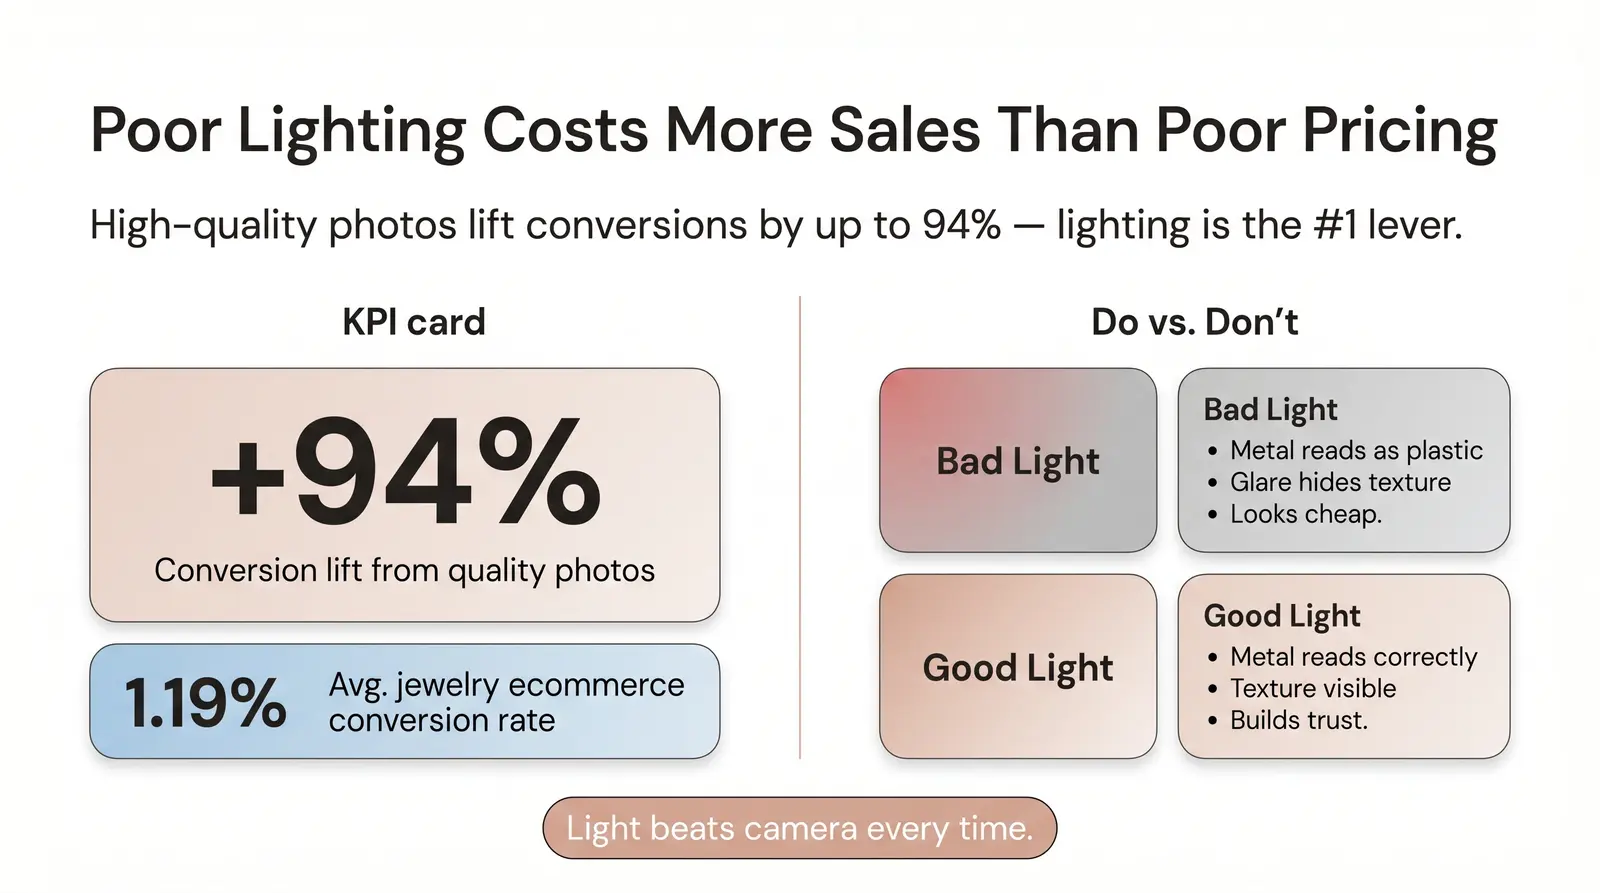
The quality of your product images directly dictates your ecommerce success. Research consistently shows that high-quality product photography increases conversion rates by up to 94% compared to low-quality photos [1]. For jewelry, where the average ecommerce conversion rate sits at a notoriously low 1.19% [2], visual presentation is the primary lever you have to turn browsers into buyers.
This comes down to the psychological trust gap. When a customer shops online, they cannot feel the weight of a pendant or see how a ring catches the light. Blurry, poorly lit, or flat jewelry photos signal low quality, regardless of the actual craftsmanship of the piece. If the image looks cheap, the customer assumes the product is cheap.
Most sellers think they need a better camera. They don't. They need better light. A $1,200 DSLR under bad lighting will lose to a smartphone in a $40 lightbox every time [3]. Lighting dictates how the camera sensor reads color, contrast, and texture. Without controlled light, even the most expensive lens will capture harsh glare and muddy shadows.
We often see founders at Branvas submit catalog photos for their brand launch that are technically sharp but lit so poorly the metal reads as plastic.
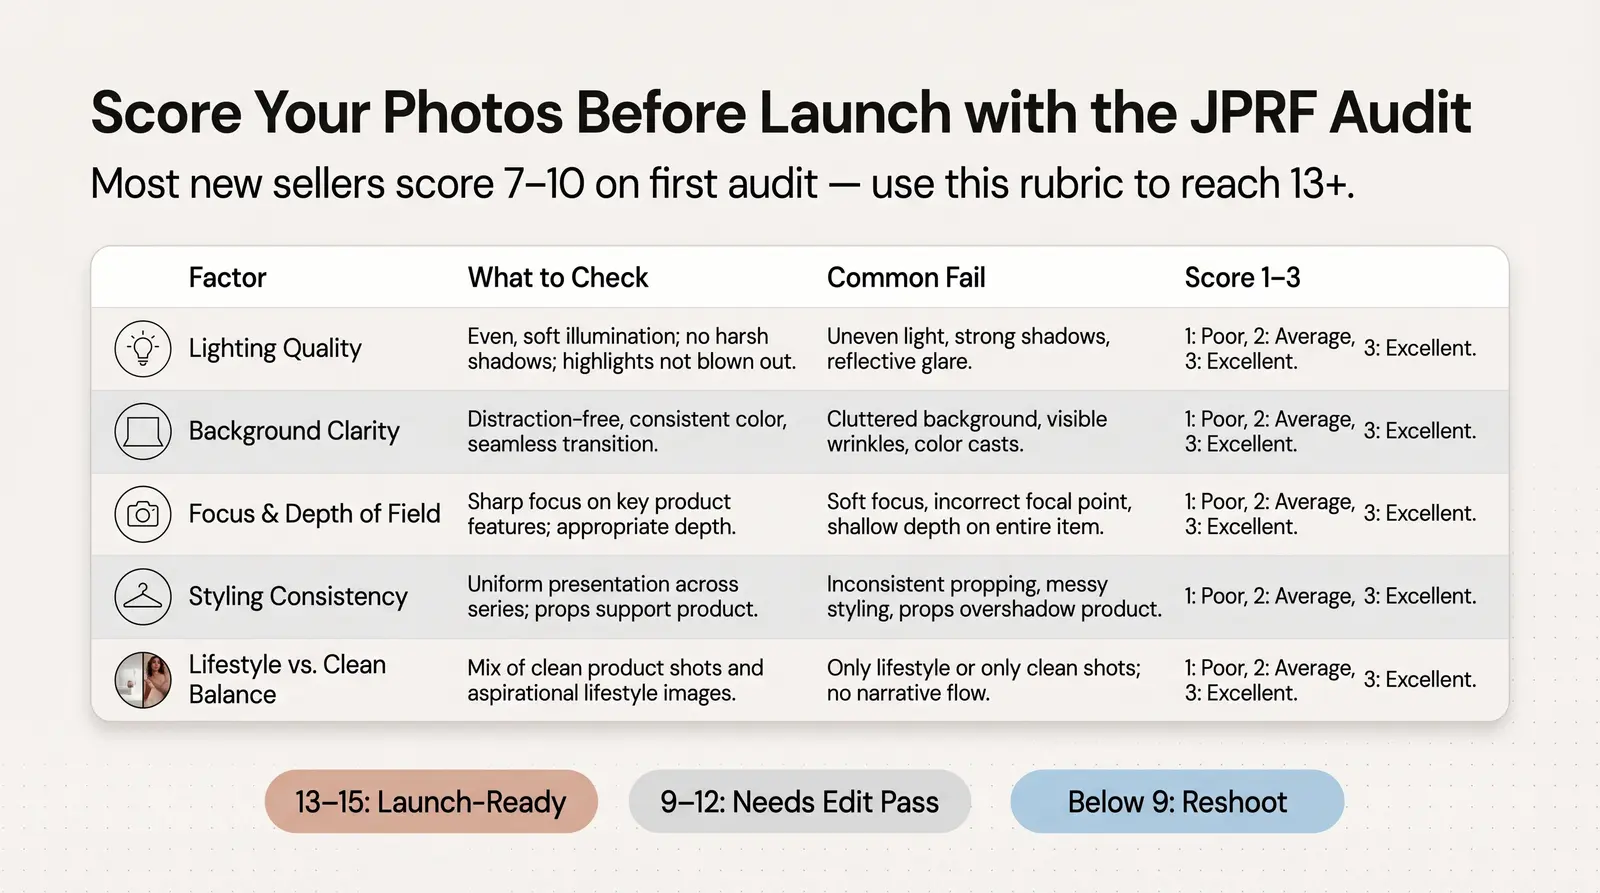
To help sellers evaluate their imagery before going live, we use a proprietary scoring system. The Branvas Jewelry Photography Readiness Framework (JPRF) is a practical rubric that any seller can use to self-audit their photos.
| Factor | What to Check | Common Fail | Score (1 to 3) |
|---|---|---|---|
| Lighting Quality | Even diffusion, no hot spots, metal reads correctly | Harsh glare or dark, muddy shadows | |
| Background Clarity | Clean, distraction-free, brand-consistent | Cluttered or textured backgrounds that compete with the piece | |
| Focus & Depth of Field | Product sharp, background handled intentionally | Blurry edges or missed focus on the main gemstone | |
| Styling Consistency | Angle, framing, and props consistent across SKUs | Mismatched angles making the catalog look disjointed | |
| Lifestyle vs. Clean Shot Balance | Both shot types present in product listing | Only showing flat-lays with no on-body context |
Scoring Guidance:
In our experience at Branvas, most new sellers score between 7 and 10 on their first audit. Not because the products aren't beautiful, but because no one taught them this checklist before launch.
A lightbox (or light tent) is a small, enclosed studio environment designed to diffuse light evenly from multiple angles. It eliminates harsh shadows and minimizes the reflections that plague jewelry photography. For beginners, a lightbox is the easiest way to achieve consistent, soft lighting. Budget options range from $30 to $80 and often include built-in LED strips.
An open setup uses standalone lights and diffusion panels (like softboxes or umbrellas) around a table. This offers more creative control over the direction and intensity of the light but requires more space and technical knowledge. For most ecommerce jewelry (rings, necklaces, bracelets), a medium-sized lightbox (around 14 to 20 inches) provides the perfect controlled environment.
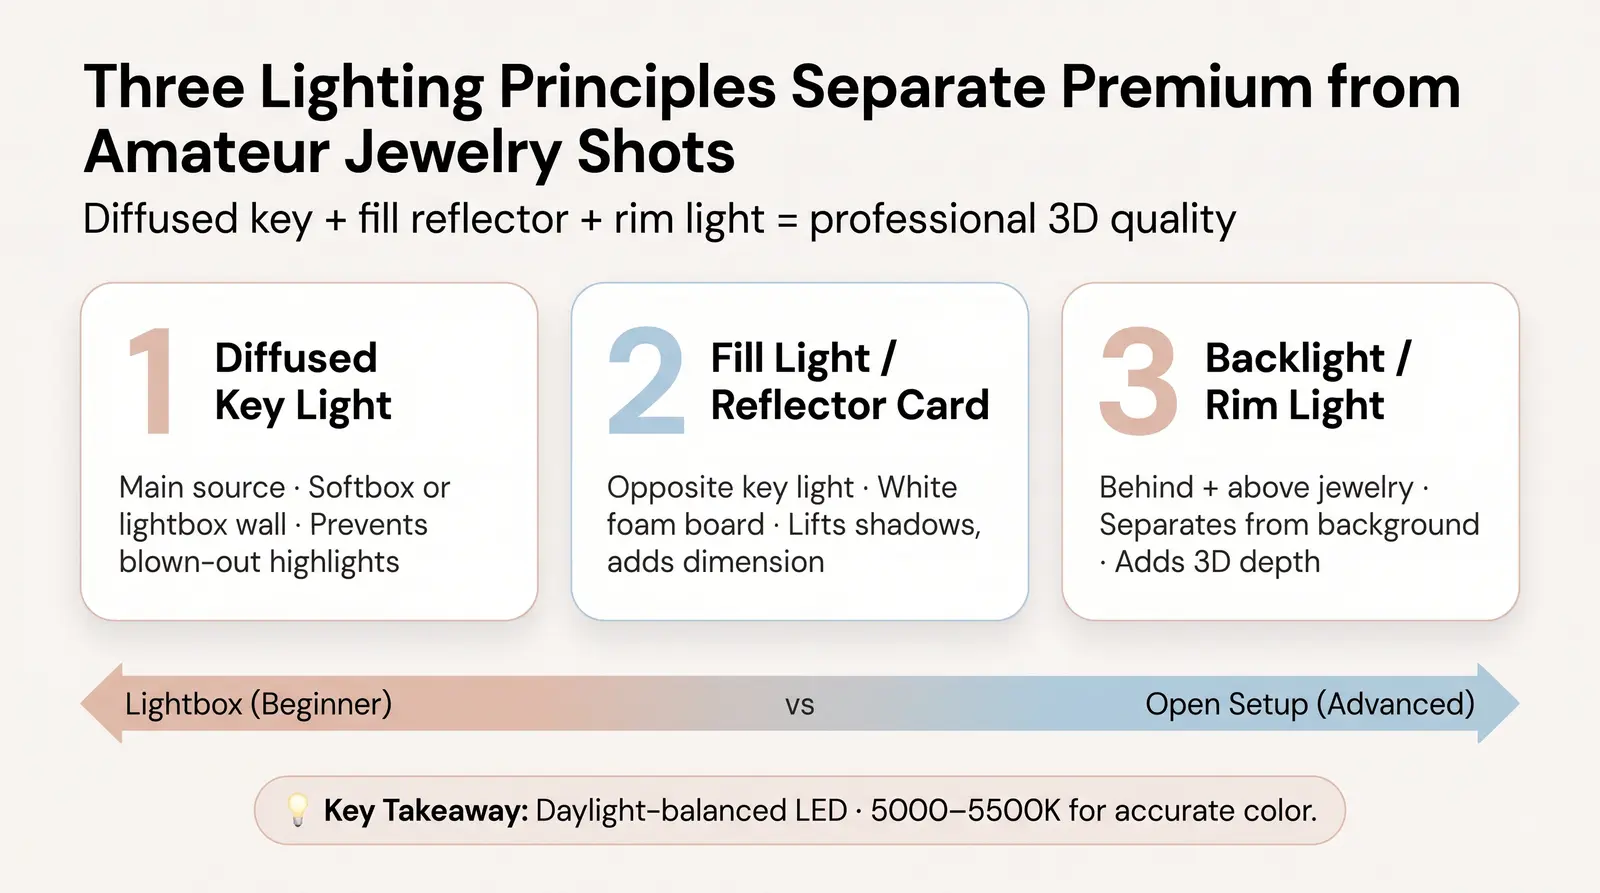
The secret to premium jewelry photography lies in three specific lighting principles referenced in the hook above.
The first is the diffused key light. This is your main light source. It must be diffused, meaning passed through a translucent material like a softbox panel or the walls of a lightbox, to soften the light and prevent harsh, blown-out highlights on reflective metals.
The second is the fill light or reflector card. Placed opposite the key light, this bounces soft light back into the shadows, ensuring the piece has dimension without losing detail in the darker areas. A simple white foam board works perfectly as a budget reflector.
The third is the backlight or rim light. A subtle light source placed behind and slightly above the jewelry separates the piece from the background and highlights the edges, adding a professional, three-dimensional quality to the final image.
Jewelry needs diffused light more than almost any other product category because of its reflectivity. As PetaPixel notes in their guide to photographing challenging products, controlled lighting is what transforms a piece from looking generic to looking premium [6]. Bare bulbs or direct sunlight will create sharp, distracting glares. When choosing artificial lights, opt for daylight-balanced LED panels or continuous daylight bulbs (around 5000K to 5500K) to ensure accurate color representation.
A tripod is non-negotiable for macro jewelry shots. When shooting close-ups, even the microscopic shake of your hands breathing will cause motion blur, ruining the crispness of the image.
Whether you are shooting overhead flat-lays or angled product shots, a sturdy tripod ensures your framing remains identical across multiple SKUs. We recommend a tripod with a ball-head mount, which allows you to easily adjust the camera angle to find the perfect reflection point for each piece.
Modern flagship smartphones, such as the iPhone 15 Pro or Samsung Galaxy S24 Ultra, perform comparably to entry-level DSLRs for product photography when the lighting is controlled [4]. The computational photography built into these devices handles exposure and color balance incredibly well.
Where a DSLR or mirrorless camera still wins is in the use of a dedicated macro lens for extreme, edge-to-edge detail, and the latitude provided by RAW files during the editing process. However, if you are using a smartphone, you can still get excellent results. Turn off "Portrait Mode" (which often artificially blurs the edges of jewelry), manually lower your ISO to reduce grain, and always tap to focus exactly on the focal point of the piece.
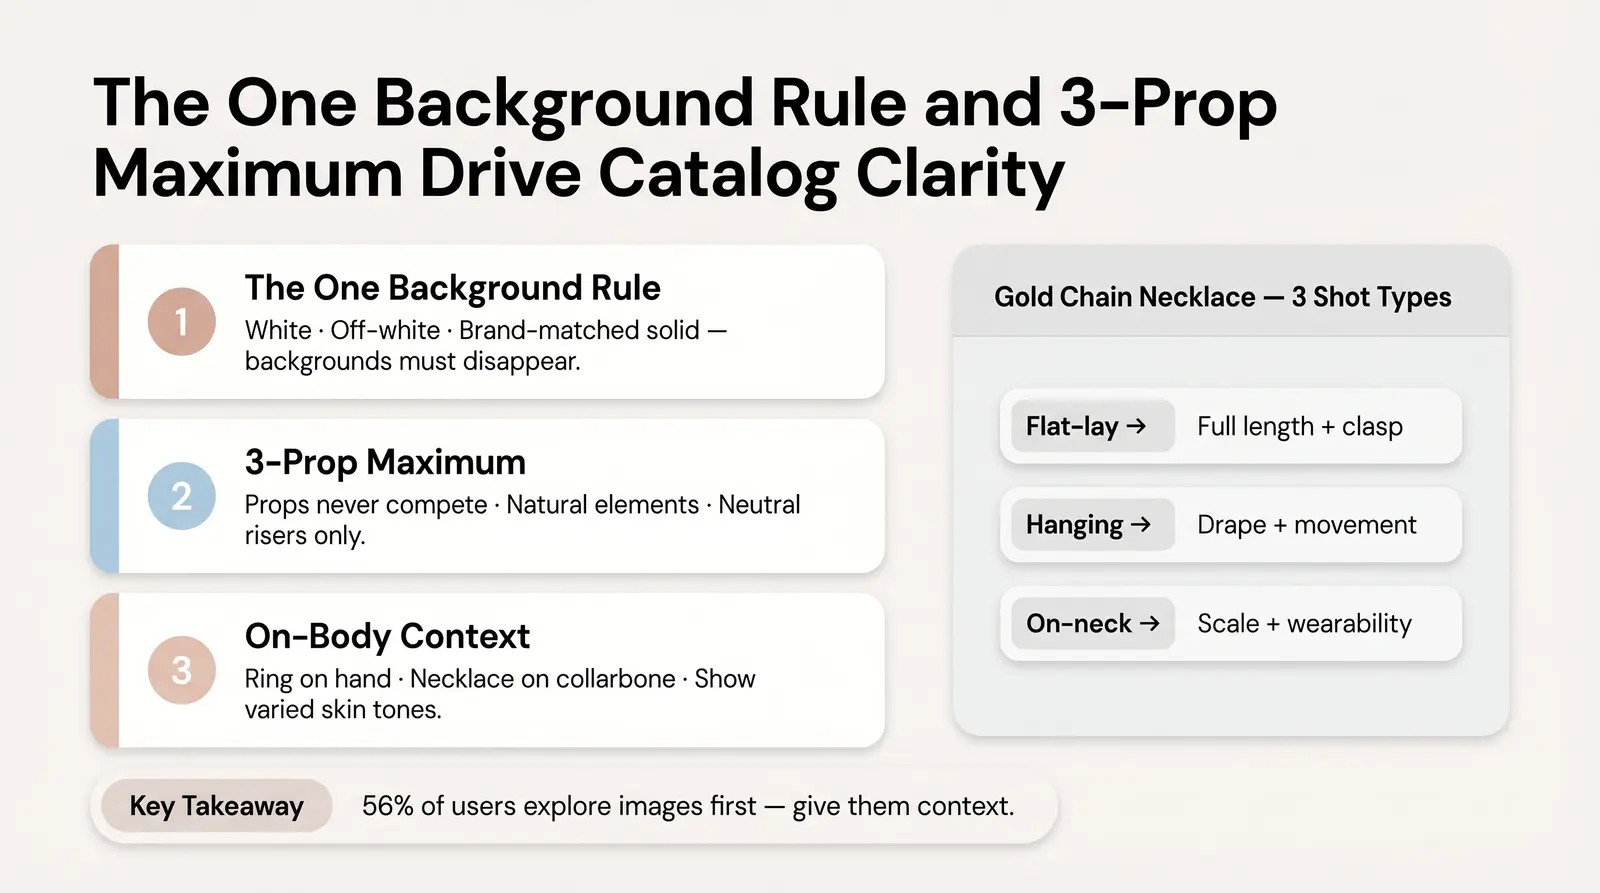
For a primary product listing image, your background must do one job: disappear. This is the "one background rule." Stick to white, off-white, or brand-matched solid backgrounds.
Patterned or busy backgrounds are conversion killers for jewelry. They distract the eye and make it difficult for the shopper to assess the details of the piece. While textured backdrops like marble, linen, or velvet can work beautifully for editorial or social media shots, they should be avoided for the main catalog image where clarity is paramount.
If you choose to use props, adhere to the "3-prop maximum" guideline: never let props compete with the jewelry. The product must always be the undisputed hero of the frame.
Appropriate props include natural elements (like smooth stones or subtle botanicals), brand-aligned objects, or neutral geometric risers. Avoid overcrowded flat-lays, unrelated lifestyle objects, or anything that obscures the piece itself.
On-body context drives purchase confidence. Seeing a ring on a hand or a necklace on a collarbone helps the buyer understand the scale, drape, and wearability of the piece. During usability testing, 56% of users immediately explore product images, and human model images are critical for providing an "in scale" comparison [5].
If you are doing DIY hand modeling, ensure the nails are clean and neutrally manicured. Position the hands naturally. Avoid stiff, forced poses. Furthermore, consider showing the piece on varied skin tones; this increases reach, relatability, and helps customers envision how the jewelry will look on them.
Different pieces require different presentation formats to show their best features. The format you choose should be driven by what the piece needs to communicate.
Worked Example: A delicate gold chain necklace. A flat-lay on white linen shows the full length and the clasp mechanism. Hanging the necklace from a clear acrylic stand shows how the chain drapes and moves. Finally, an on-neck lifestyle shot shows the scale and wearability in context. Use all three across the listing and you give the buyer complete confidence before they ever click "Add to Cart."
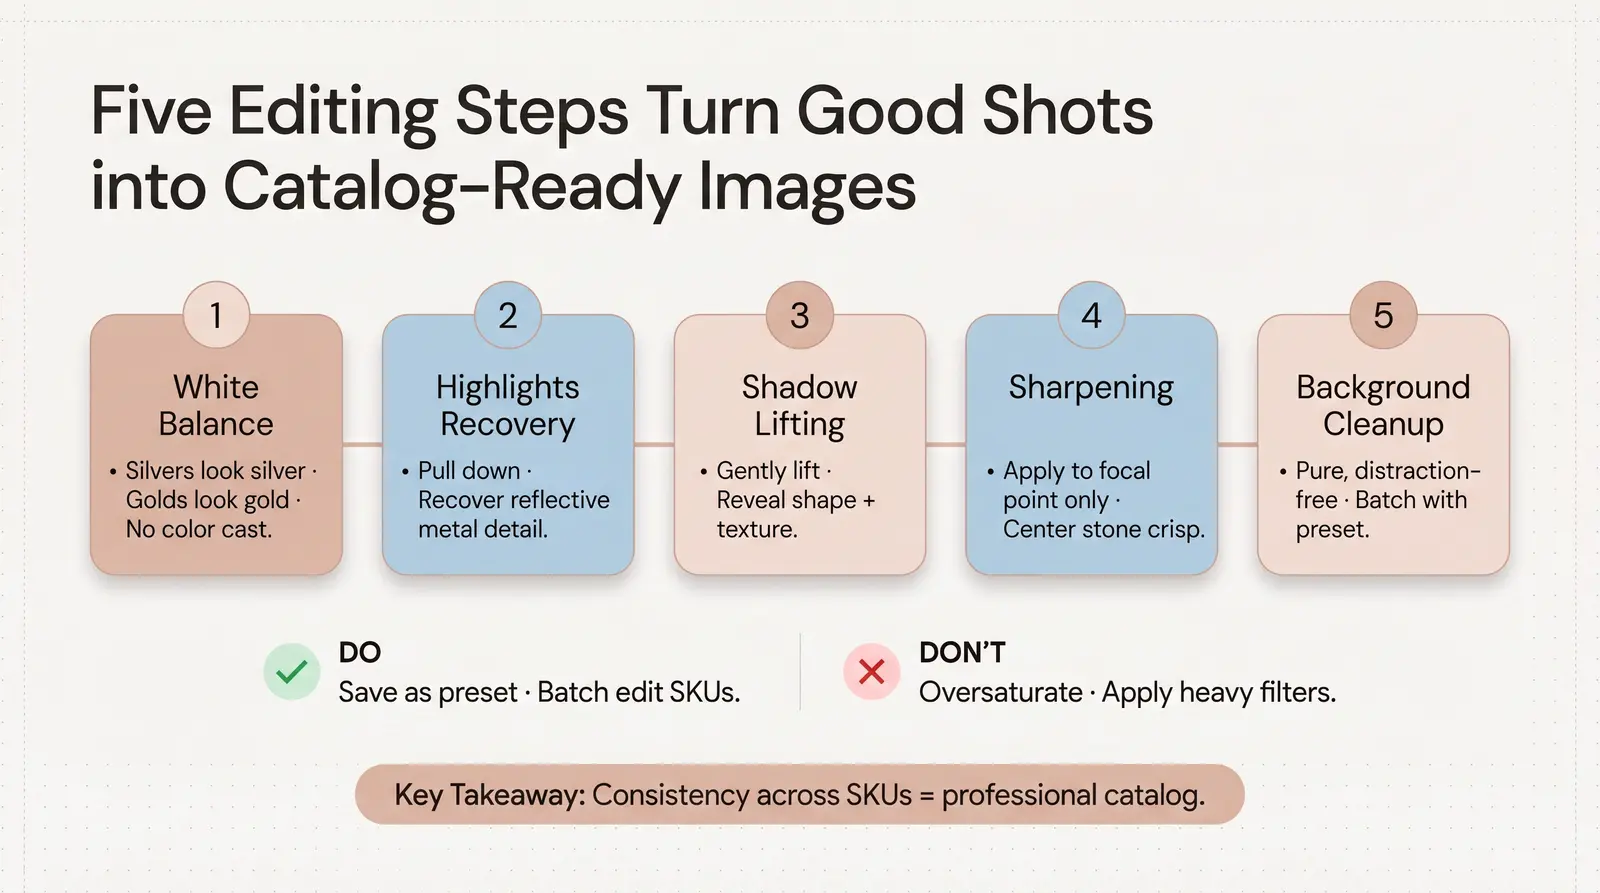
Even with perfect lighting, jewelry photos require post-processing to look professional. You can use Adobe Lightroom or free alternatives like Snapseed, VSCO, or Canva.
Here is the step-by-step editing process:
Do not over-edit. Never oversaturate gemstone colors or apply heavy, stylized filters that misrepresent the actual color of the material. For consistency across your catalog, save your adjustments as a preset and batch-edit your SKUs. Additionally, AI-powered background removal tools (like remove.bg) are a legitimate and time-saving part of a modern workflow.
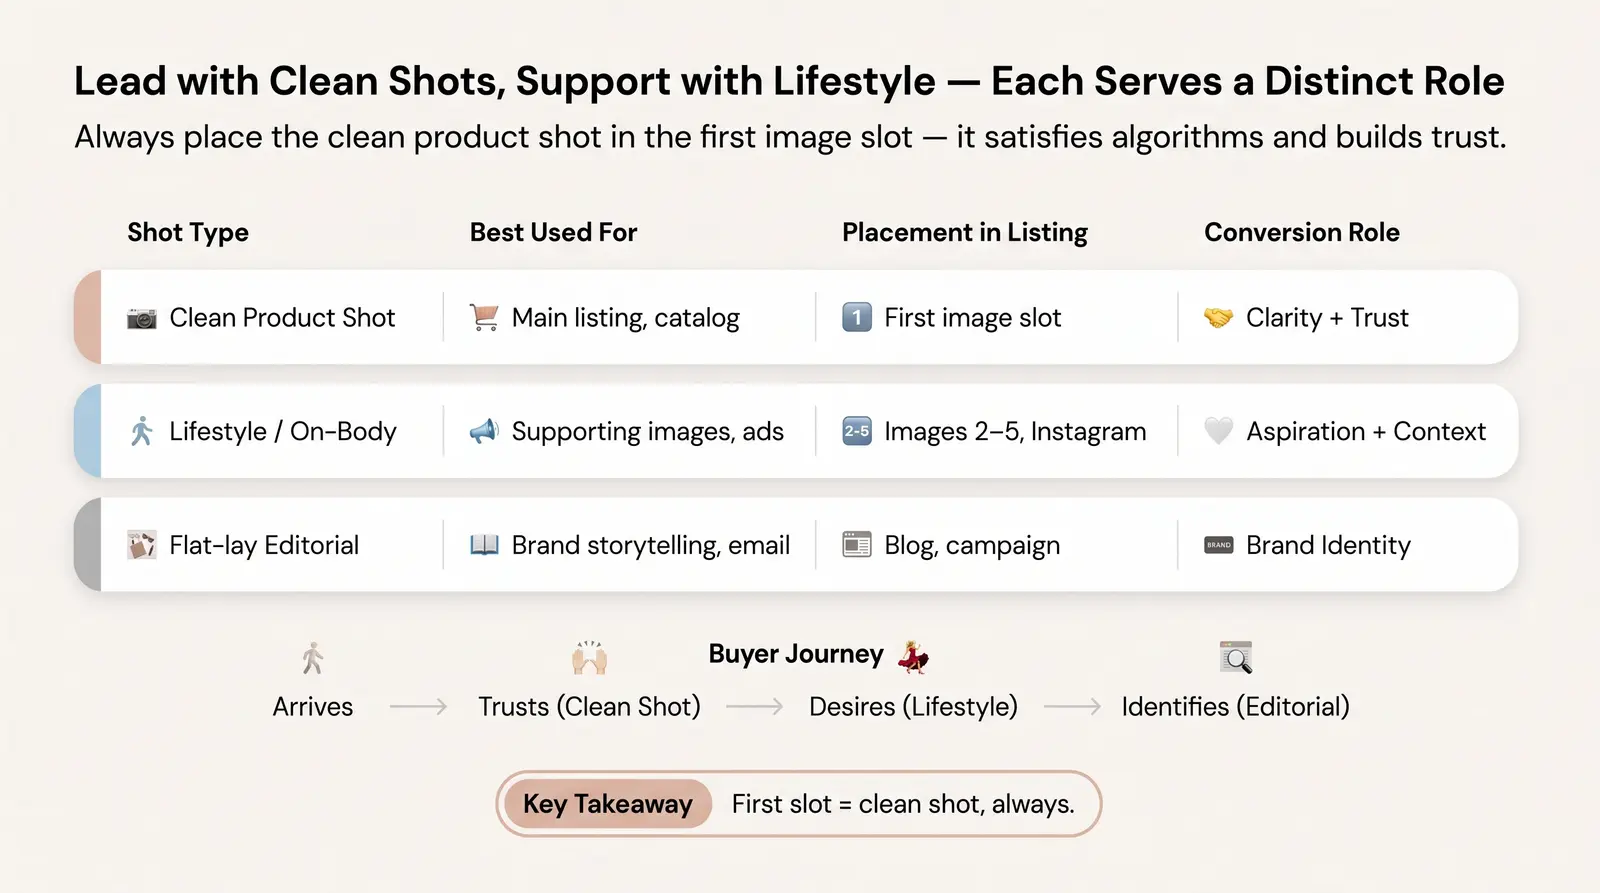
A high-converting product listing requires a mix of imagery. Clean product shots and lifestyle shots serve distinct purposes in the buyer's journey.
| Shot Type | Best Used For | Placement in Listing | Conversion Role |
|---|---|---|---|
| Clean product shot | Main listing image, catalog | First image slot | Clarity + trust |
| Lifestyle / on-body | Supporting images, social media, ads | Images 2 to 5, Instagram | Aspiration + context |
| Flat-lay editorial | Brand storytelling, email, Pinterest | Blog, campaign | Brand identity |
Always lead with the clean product shot in the first image slot. This satisfies marketplace algorithms and establishes immediate consumer trust by showing exactly what is being purchased.
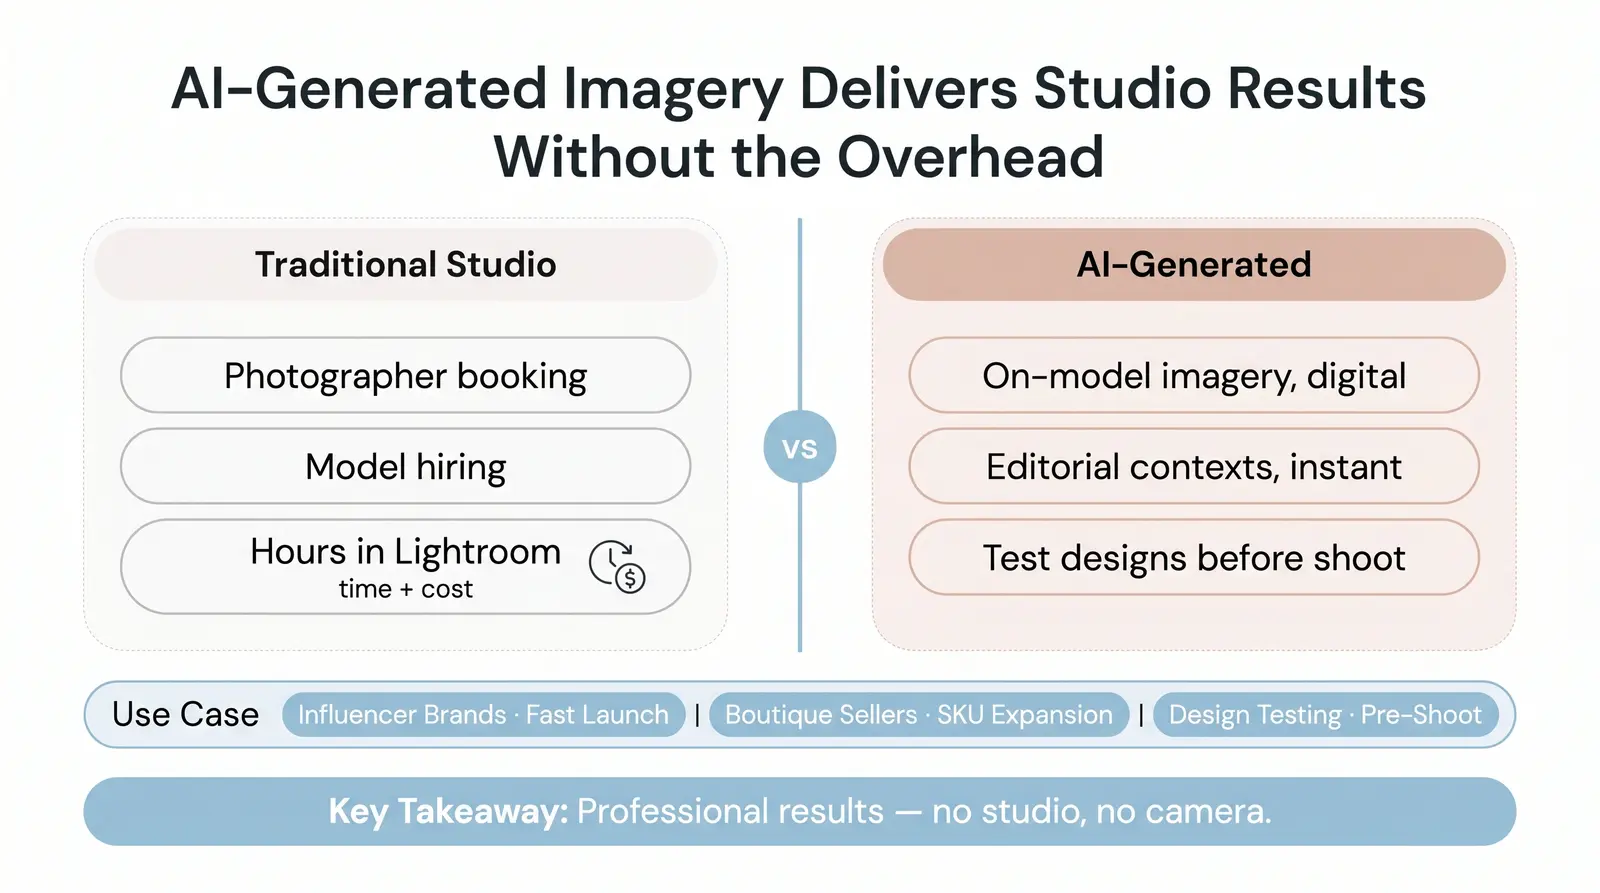
Mastering a traditional DIY photography setup takes time, equipment, and skill. It is absolutely worth learning, but it is no longer the only way to get professional results.
Today, AI-generated product imagery and model try-on images are commercially viable and increasingly used by top ecommerce brands. Instead of organizing a photoshoot, hiring models, and spending hours in Lightroom, sellers can now generate photorealistic lifestyle and on-body images digitally.
This is where Branvas Brand Studio comes in. It allows you to place your jewelry in stunning on-model and editorial contexts without ever picking up a camera. This is particularly valuable for influencer jewelry brands who need to launch fast, boutique ecommerce sellers expanding their SKU count, or anyone who wants to test new product designs before committing to a full physical photoshoot.
If you are building a jewelry brand and want to see what your pieces look like on model without booking a photographer, explore Branvas Brand Studio. It is included as part of the Branvas platform. We built Brand Studio specifically because we watched talented sellers launch great products with poor imagery and lose the sale in the first three seconds.
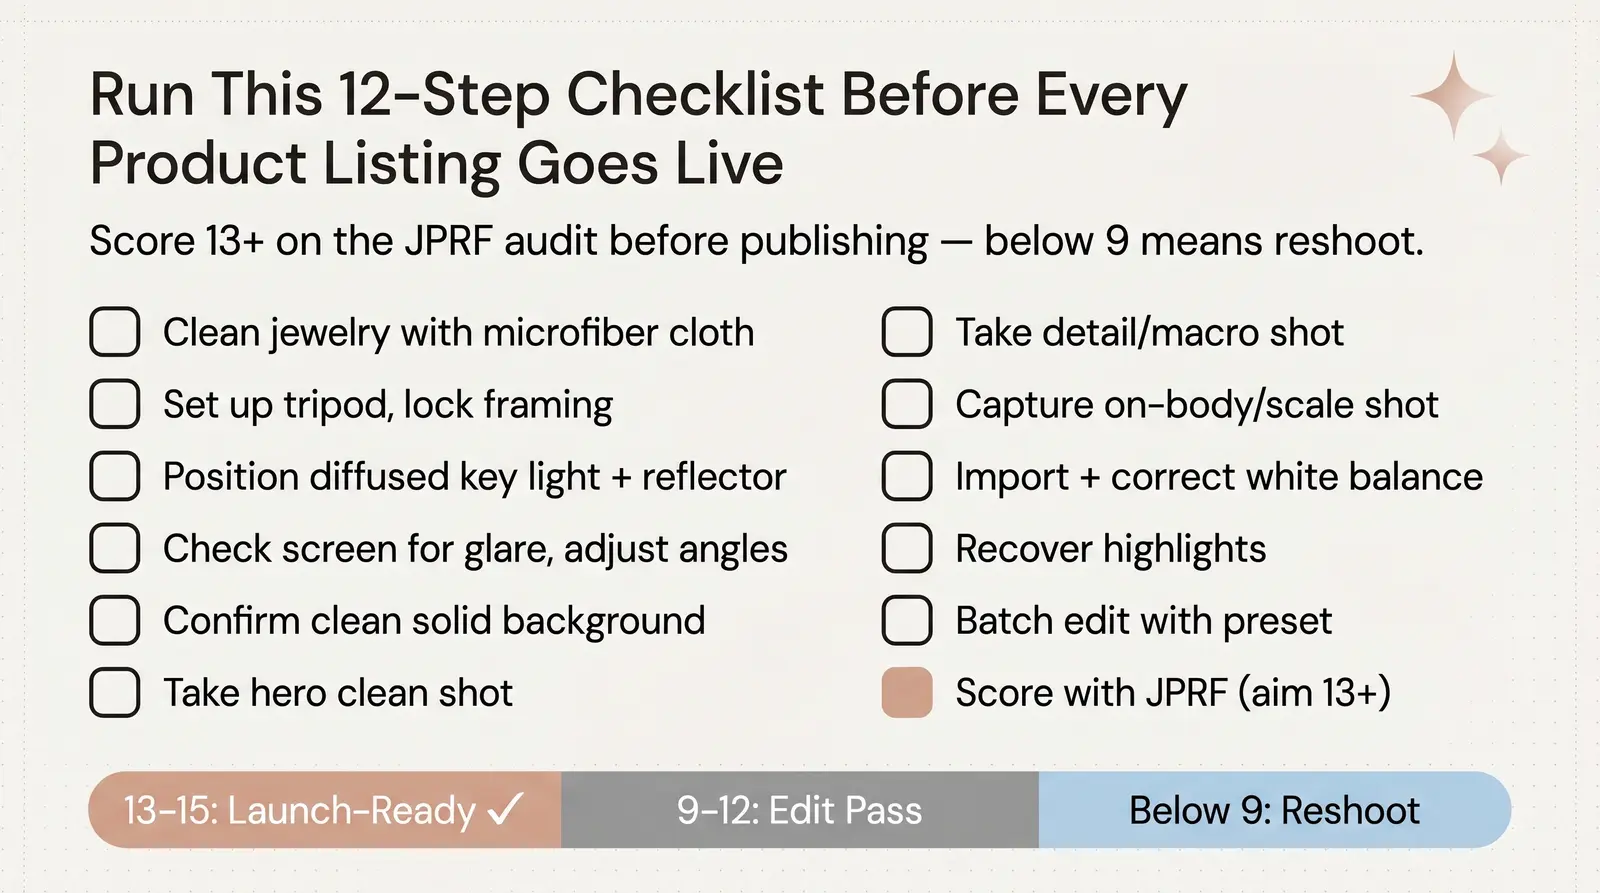
Before you publish your next product listing, run through this checklist:
Ready to launch your jewelry brand without sourcing, packaging, or photography headaches? Branvas handles everything from private-label product creation to AI-generated imagery. You can also browse the Branvas catalog to see the product range available for your brand. See how it works →
The best lighting for jewelry is soft, diffused continuous light. Because jewelry is highly reflective, bare bulbs or direct sunlight will create harsh glare and dark shadows. Using a lightbox or placing diffusion panels (like softboxes) between your light source and the jewelry ensures the light wraps evenly around the piece, highlighting the metal's texture without blowing out the details.
Yes, modern smartphones are excellent for jewelry photography, provided your lighting is controlled. Devices like the iPhone 15 Pro have advanced sensors that capture sharp details. To get the best results, turn off portrait mode, use a tripod to prevent motion blur, and tap the screen to lock focus and exposure on the most important part of the jewelry.
For your main ecommerce listing image, use a pure white or light, neutral solid background. This adheres to the "one background rule," ensuring there are no distractions and the jewelry remains the sole focus. You can use textured backgrounds like marble or velvet for secondary lifestyle shots, but the primary image must prioritize clarity.
To eliminate glare on reflective jewelry, you must diffuse your light source and control the reflections. Use a light tent or bounce your light off a white reflector card rather than pointing it directly at the piece. If you are still seeing dark reflections of your camera or room, place a white piece of foam board with a small hole cut out for your lens between the camera and the jewelry.
While you don't need a model for your primary catalog shot, having at least one on-body image is highly recommended. Seeing jewelry on a human model provides essential context for scale, drape, and fit, which significantly increases buyer confidence. If hiring a model isn't feasible, you can use AI tools like Branvas Brand Studio to generate realistic on-model try-on images.