Fear brand dilution? Discover the Zero-Risk Product Test Ladder—a proprietary framework for apparel brands to safely test jewelry demand using on-brand photography, not risky bulk inventory.
Published:
January 29, 2026
Author:
Yi Cui
For apparel store owners, the idea of expanding into new product categories is both exciting and terrifying. You’ve poured your heart and soul into building a brand that resonates with your customers, and the last thing you want to do is dilute that hard-earned trust with a poorly executed product test. The internet is littered with advice on dropshipping test products, but most of it is geared towards a churn-and-burn model that simply doesn’t work for established apparel brands. The real fear isn’t getting stuck with a few unsold necklaces; it’s the risk of associating your brand with what customers perceive as “cheap AliExpress junk.”
This article presents a different approach—a zero-risk testing method that protects your brand quality while requiring minimal investment of time and money. We’ll introduce a sample-based photo test, a pre-sell strategy to validate demand, and a fulfillment-ready pipeline that eliminates inventory risk. By the end of this guide, you’ll have a clear, actionable playbook for testing and adding jewelry to your clothing store without compromising the brand you’ve worked so hard to build.
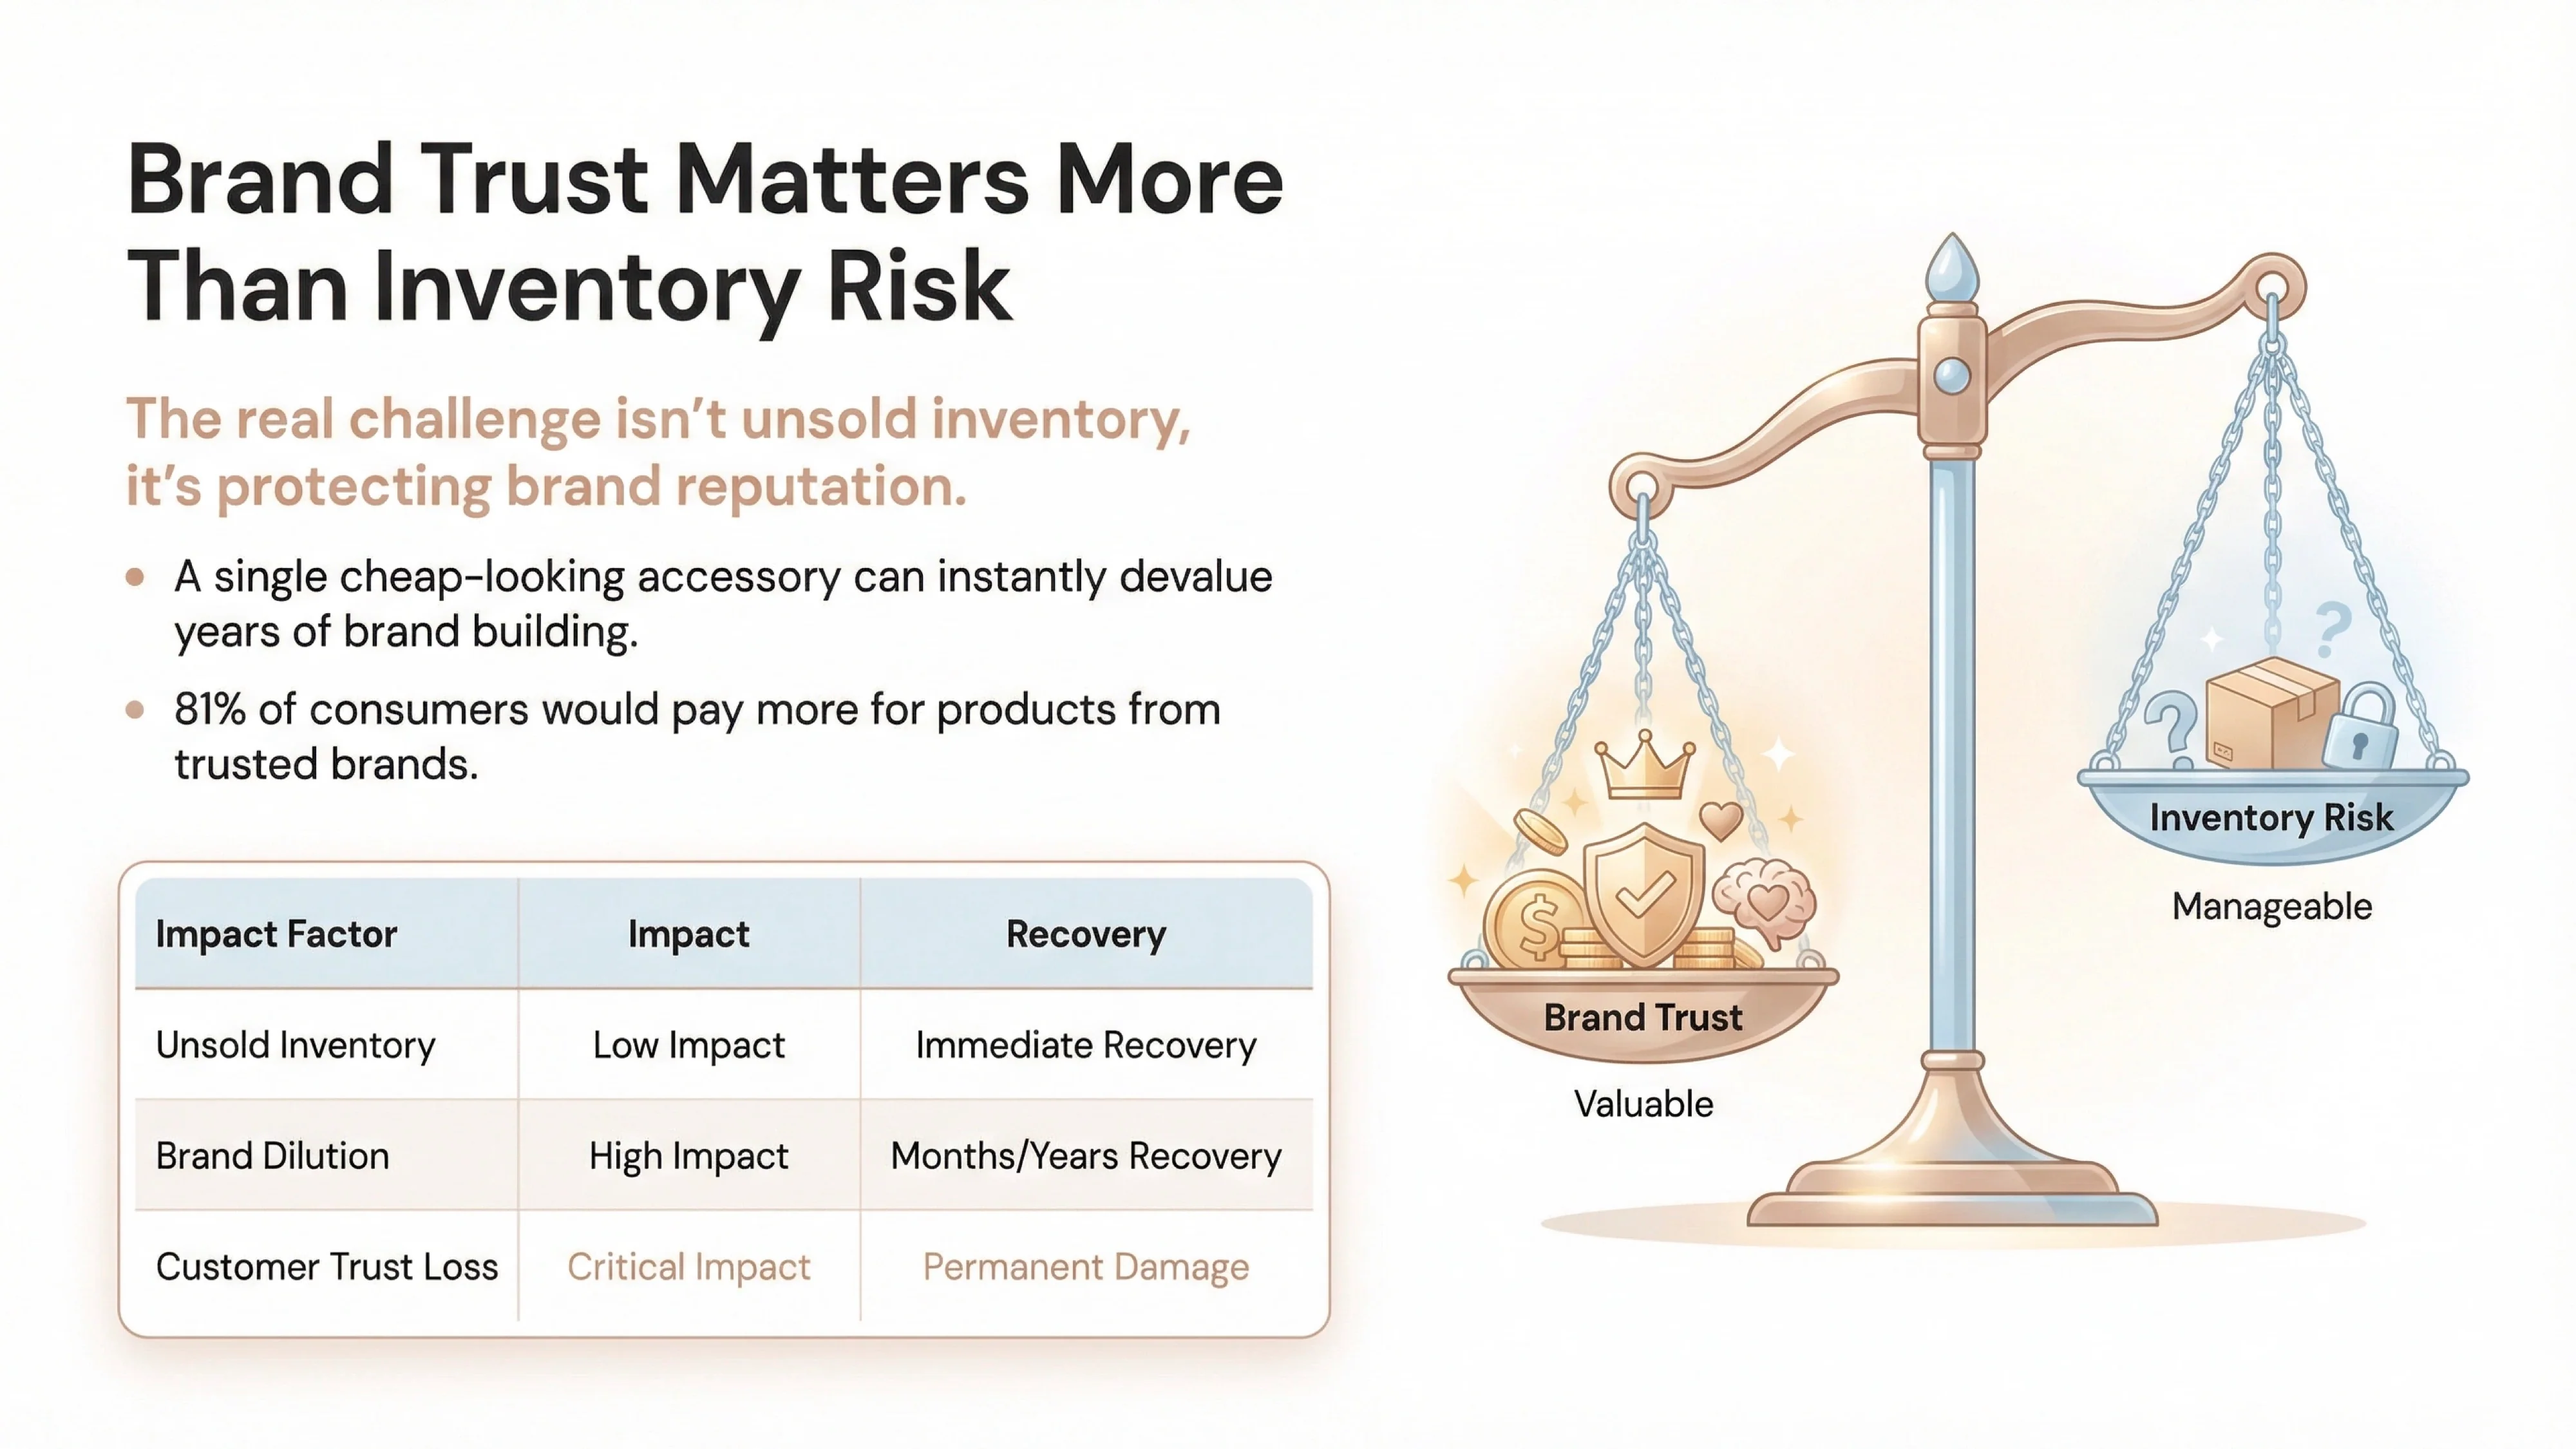
The standard advice for dropshipping test products often revolves around a high-volume, low-margin approach that prioritizes speed and quantity over quality and brand alignment. This model, while potentially effective for general stores or those just starting, is a minefield for established apparel brands. Generic product testing tips frequently ignore the critical role of brand perception, a factor that is exponentially more important in fashion than in almost any other retail category. As marketing leaders have noted, in an increasingly automated and crowded market, brand trust is the ultimate differentiator [2].
For an apparel brand, the risk associated with a “cheap accessory” is significantly higher than that of a new clothing item. A poorly made garment might be seen as a one-off quality control issue, but a flimsy, cheap-looking necklace or pair of earrings can instantly devalue the entire brand aesthetic you’ve meticulously crafted. This is because accessories are often perceived as a reflection of a brand’s attention to detail and overall commitment to quality. The danger isn’t just about a single lost sale; it’s about brand dilution. As consumers become more discerning, they are increasingly willing to pay a premium for brands they trust, with one 2025 study noting that 81% of consumers would pay more for a product from a trusted brand [5]. Introducing a product that feels cheap or inauthentic can shatter that trust in an instant.

Furthermore, the operational consequences of a failed accessory test are more severe. While returns are a part of any ecommerce business, trust and return issues hit harder with accessories. A customer who receives a necklace that breaks after one wear or a ring that tarnishes in a week is not just going to return the item; they are likely to lose faith in your entire brand. The cost of acquiring a new customer has surged by 40% in the last two years, making customer retention the only sustainable revenue engine for most brands [3]. A negative experience with a low-quality accessory can easily lead to the loss of a loyal apparel customer, making the true cost of a “cheap” product test far higher than the initial wholesale price.
To safely navigate the complexities of adding a new category, we developed the Zero-Risk Product Test Ladder (ZPTL). This proprietary framework moves beyond generic advice and provides a structured, brand-centric methodology for apparel stores to test jewelry. It’s not about finding the next viral gadget; it’s about methodically de-risking a new product category to ensure it enhances, rather than detracts from, your core brand.
In our experience at Branvas, we often see founders struggle with where to start. The ZPTL framework breaks the process down into five sequential tests, each designed to answer a critical question before you commit any significant resources. You only advance to the next rung of the ladder once the previous test is passed.
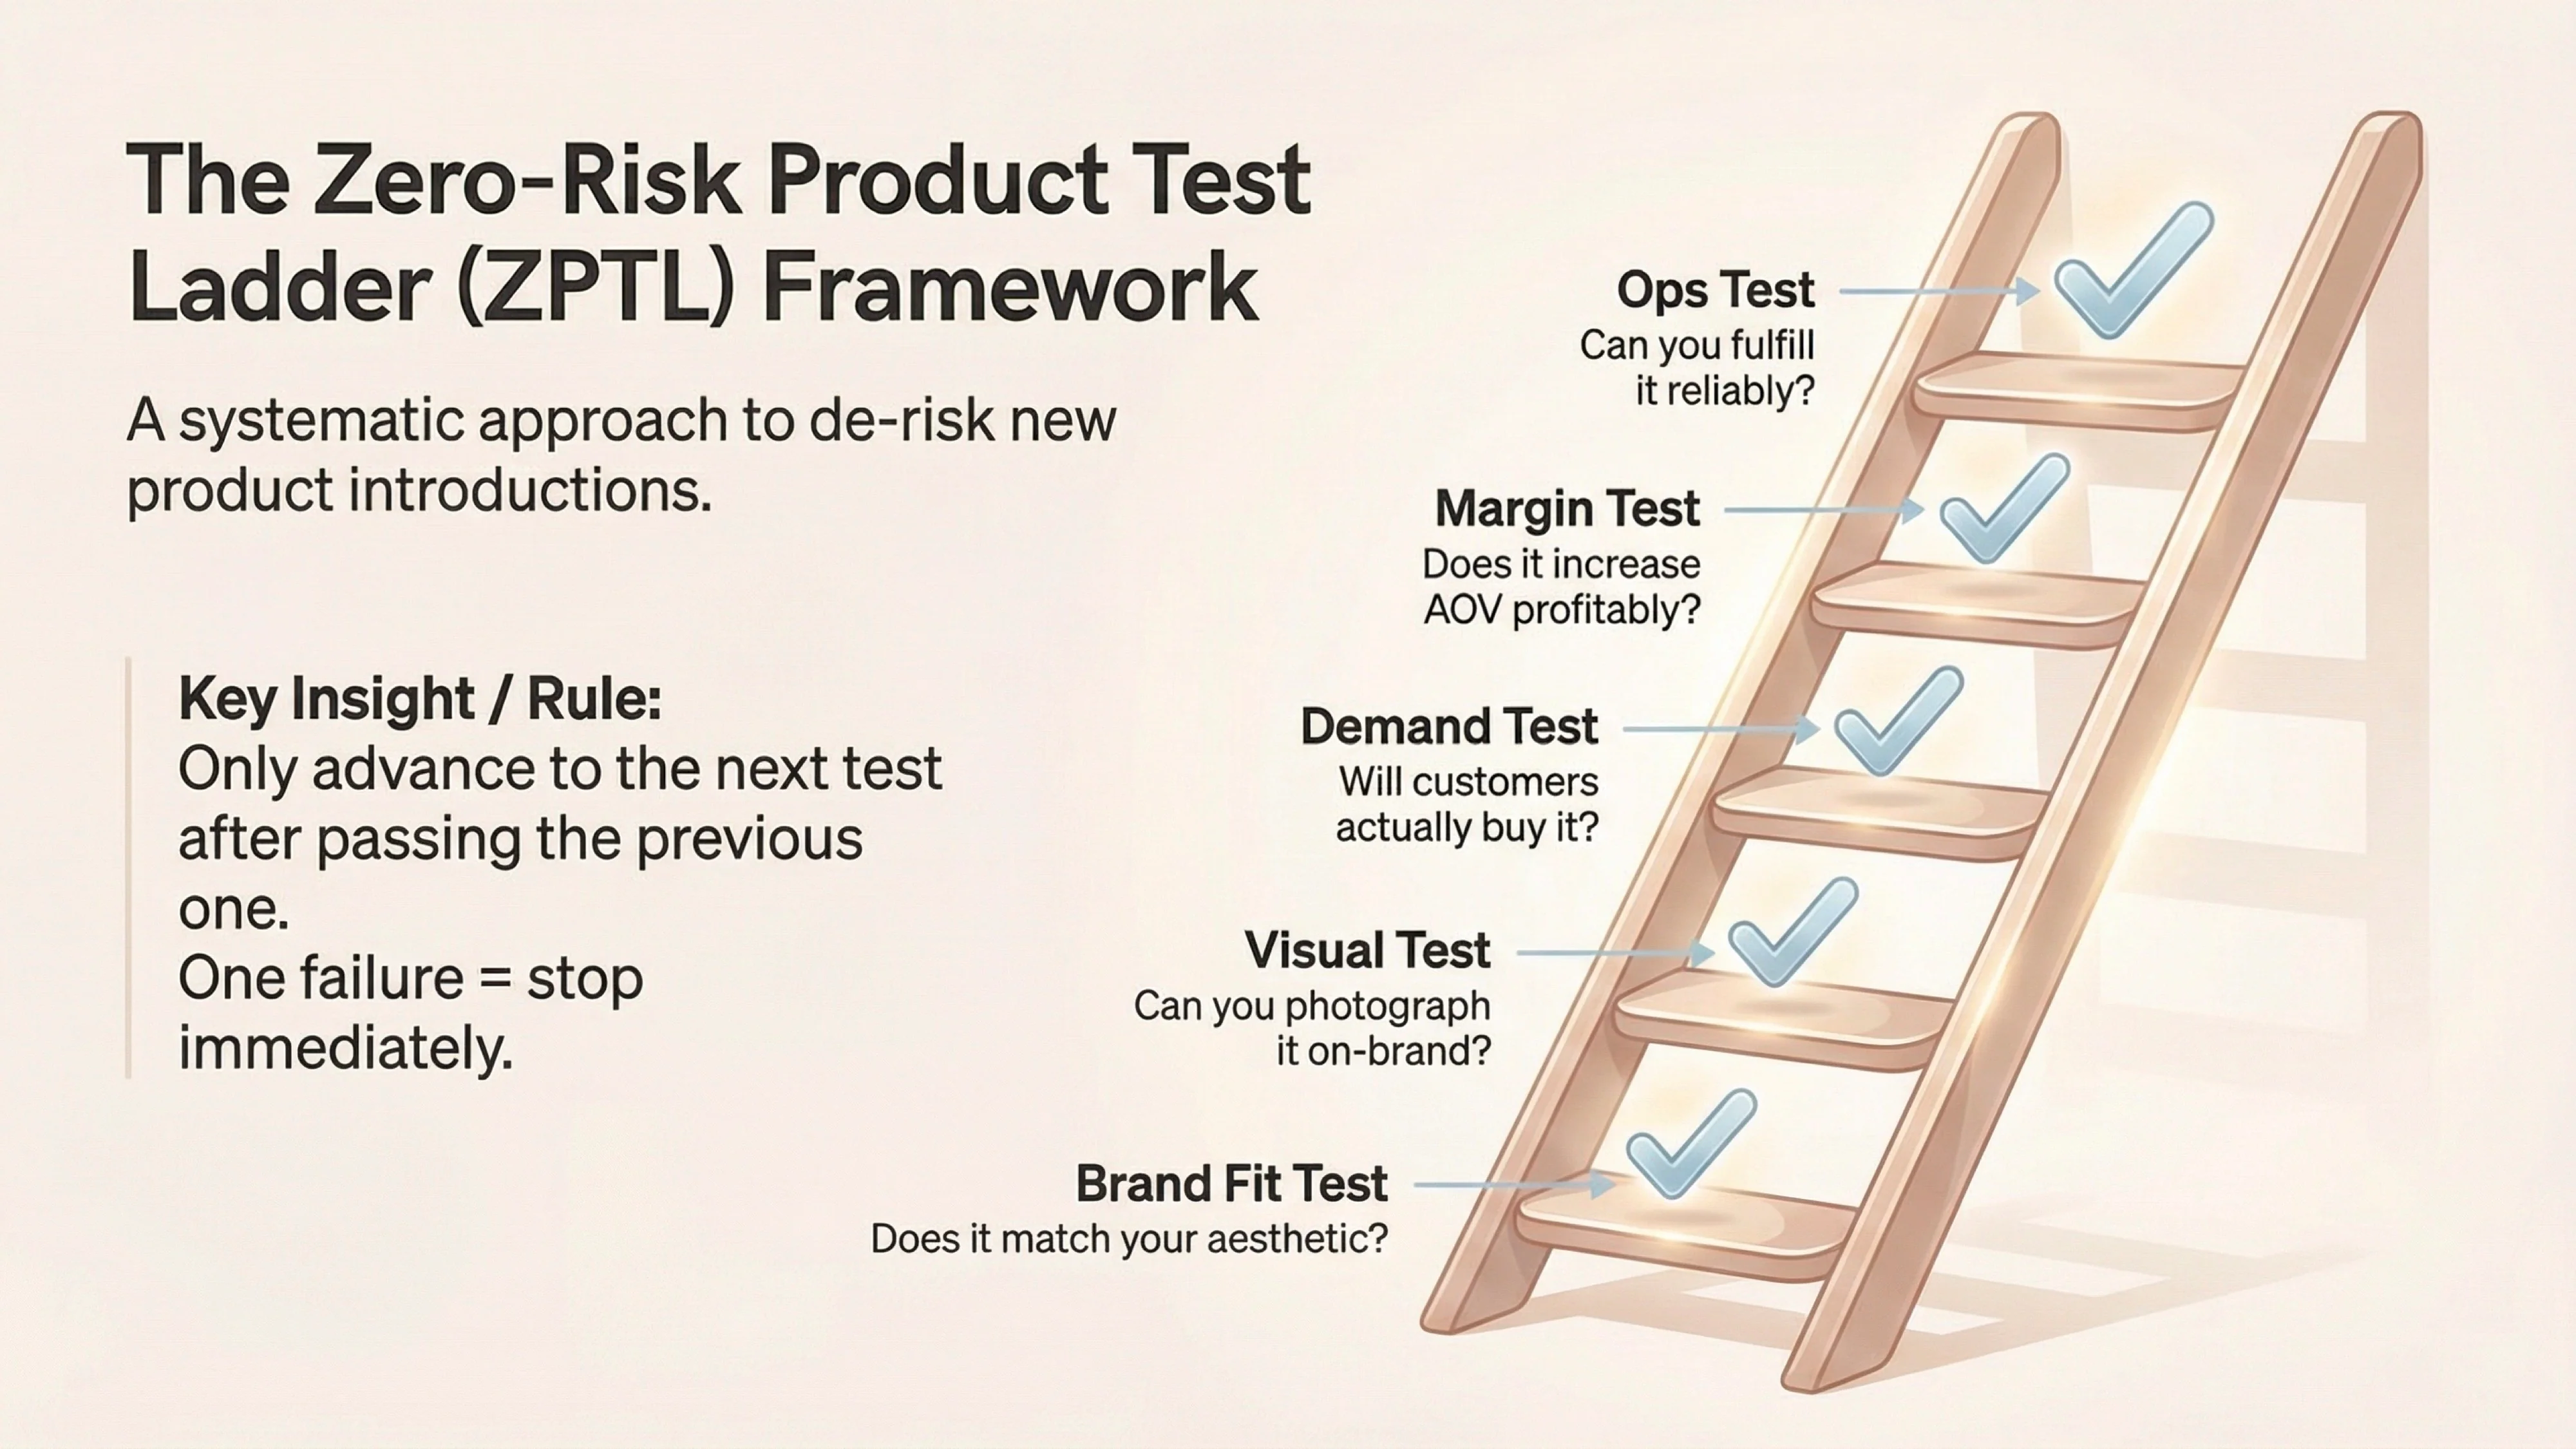
Here are the five steps of the ladder:
Let’s explore each step in the context of an apparel store testing a new jewelry line.
Before you even look at a supplier catalog, the first test is purely internal. The goal is to determine if a piece of jewelry aligns with your brand’s identity. If you sell minimalist linen dresses, a chunky, brightly colored statement necklace is an immediate fail, no matter how low the cost or high the potential margin. A 2026 McKinsey report highlights that many fashion brands are now "moving upmarket" by focusing on product quality and standout experiences to upgrade their positioning [4]. A mismatched accessory undermines this effort instantly.
How to apply it: Create a simple checklist based on your brand guidelines. Ask questions like:
Only consider products that score a decisive "yes" across the board.
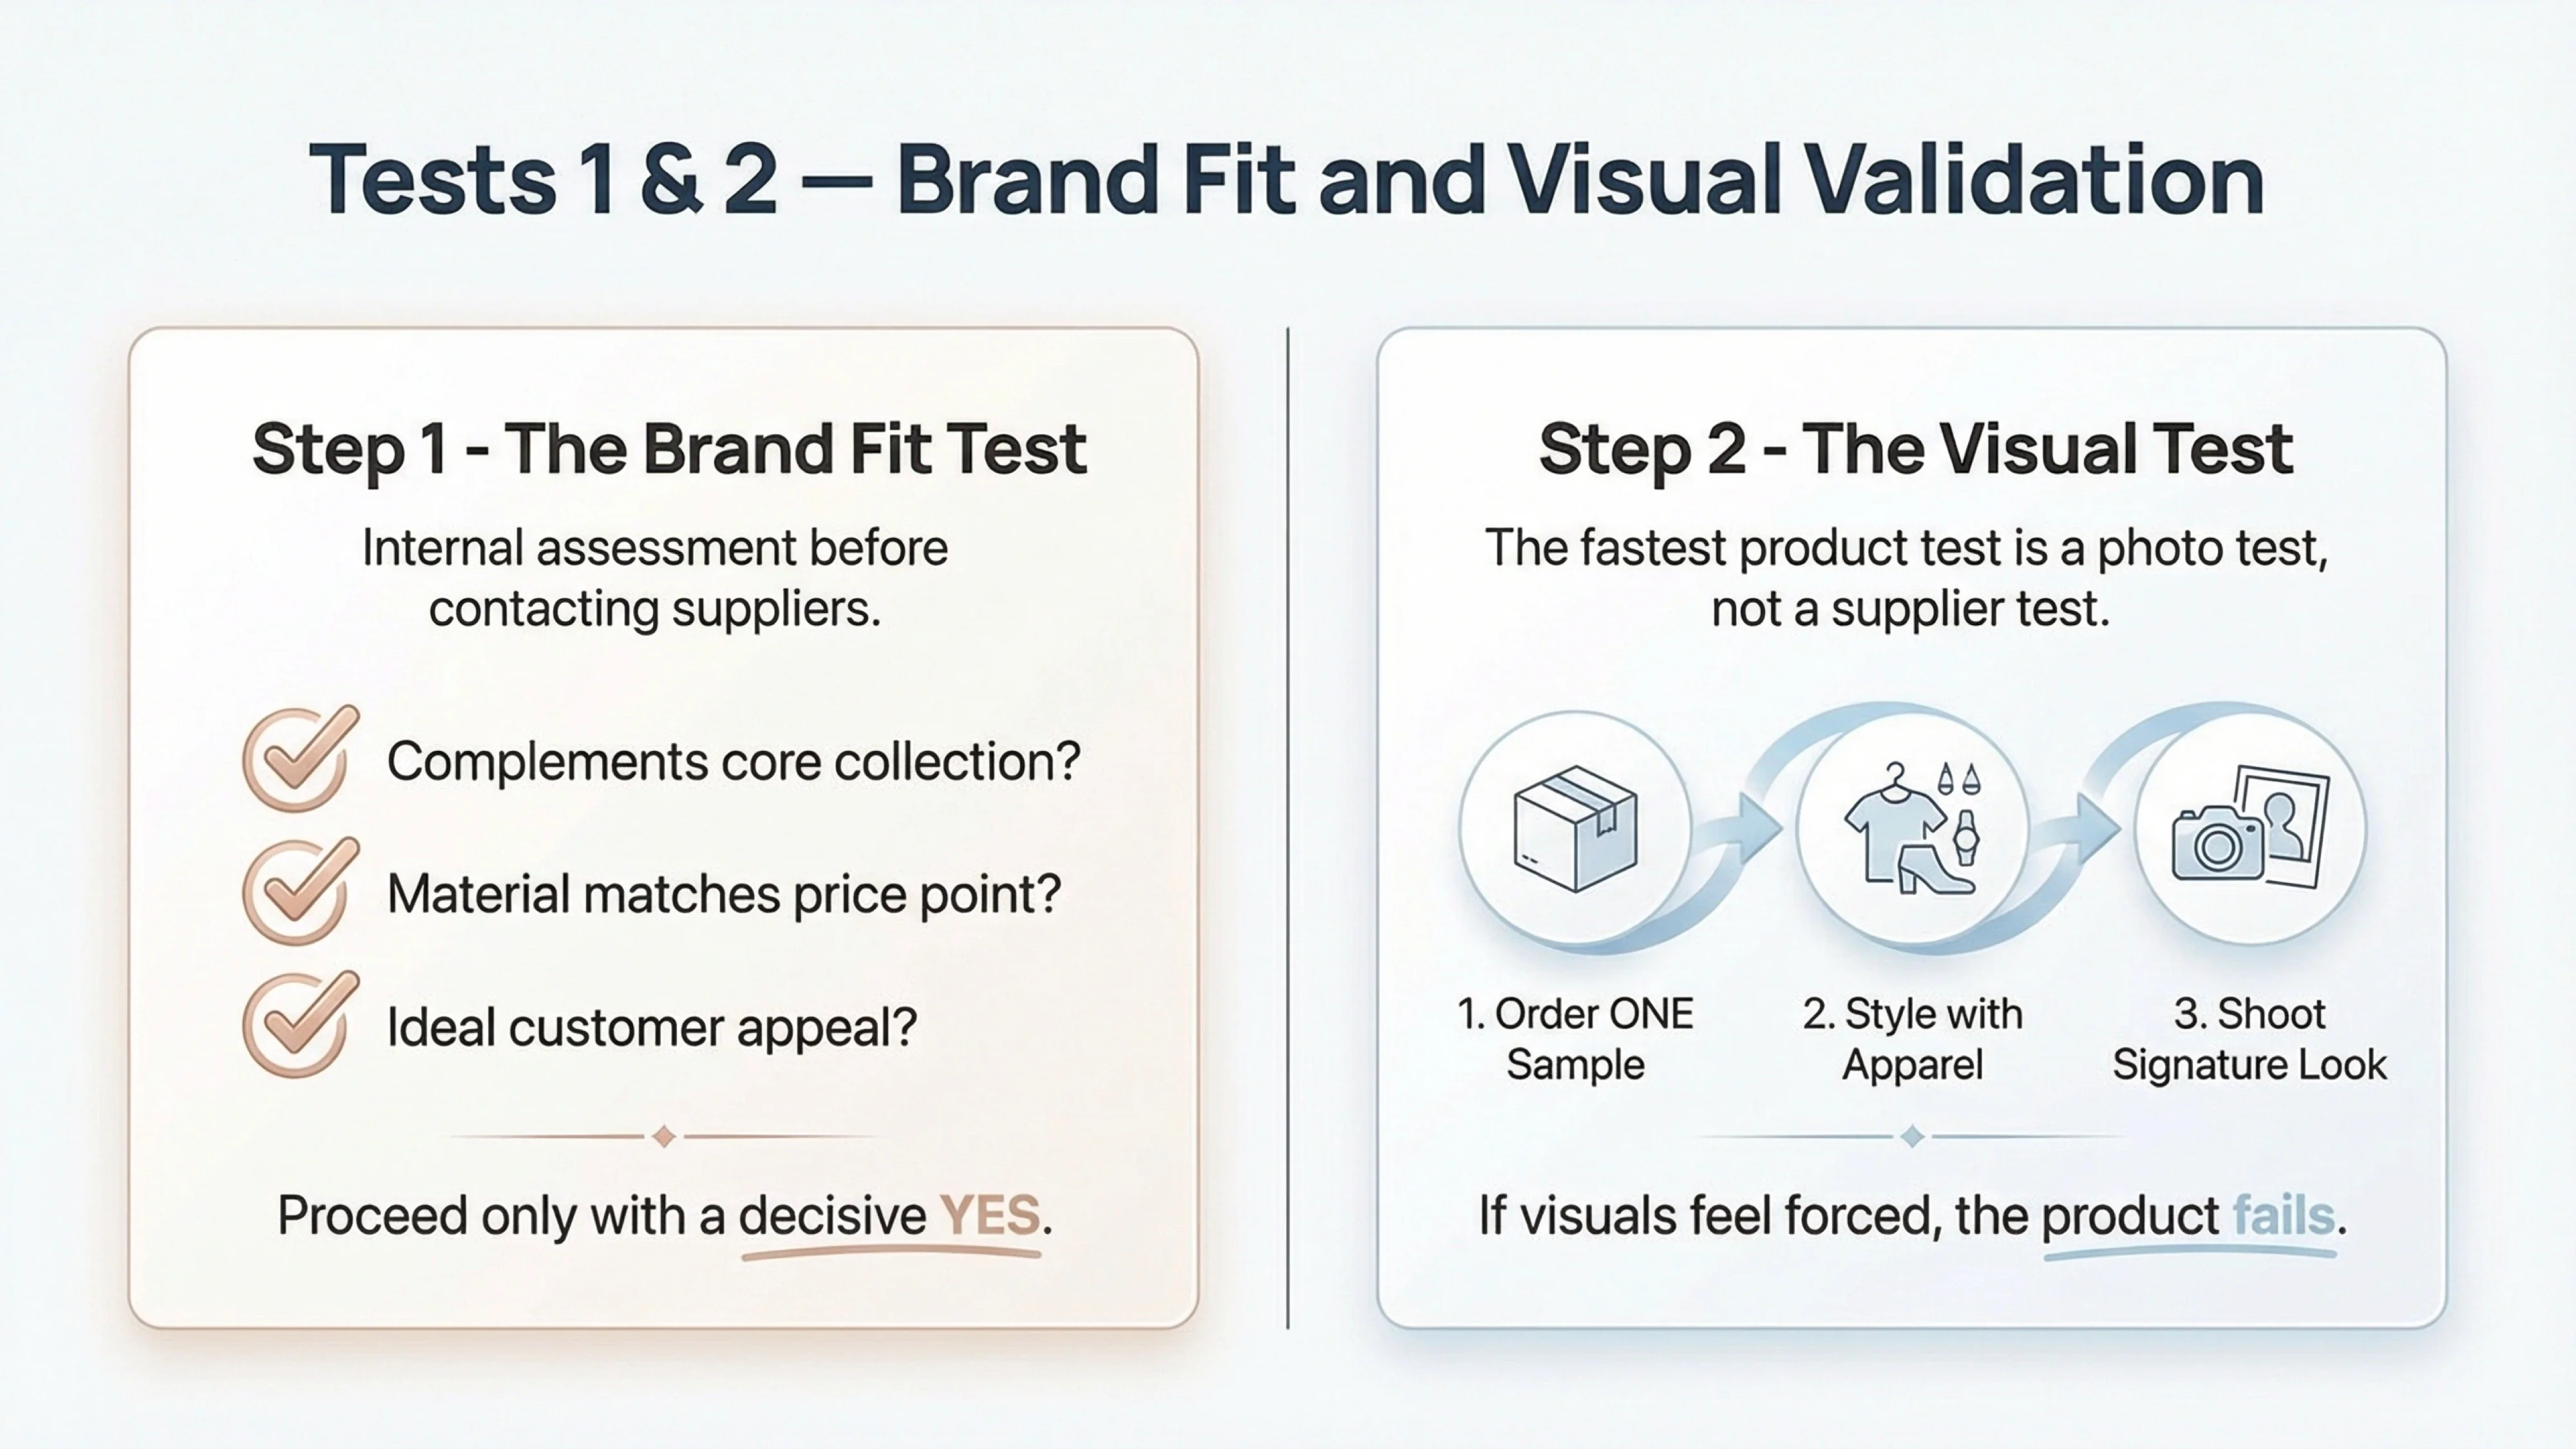
This is the contrarian insight that most dropshipping guides miss: the fastest product test is a photo test, not a supplier test. Consumers buy fashion with their eyes. If you can’t make the product look like it belongs on your website and in your social feed, it doesn’t matter how great the product is in person. The goal here is to confirm that you can produce on-brand visual assets. Using generic supplier images is the quickest way to signal "cheap dropshipping junk" and erode the brand trust you’ve built.
How to apply it: Order a single sample. Don’t order bulk, don’t negotiate with suppliers—just get one piece in your hands. Then, style it with your existing apparel and shoot it in your signature photographic style. Does the necklace drape correctly on your best-selling dress? Do the earrings look premium under your studio lighting? If the visuals feel forced or inconsistent, the product fails the test.
Once you have on-brand imagery, you can test for the most crucial factor: demand. But you don’t need inventory to do it. This is where a pre-sell or a "complete the look" bundle strategy comes in. You are testing your customers’ willingness to purchase the item based on the visuals you created. What consistently works when testing new categories is leveraging your existing customer base, as you have a 60-70% probability of selling to an existing customer, compared to just 5-20% for a new prospect [3].
How to apply it: Use your new photos to create a product page and add the jewelry as a cross-sell or bundle offer on the product pages of your core apparel items. Promote the "complete the look" concept to your email and SMS subscribers. You can either take pre-orders or, for a completely zero-risk approach, simply track the attach rate (how many people add it to their cart) without enabling the final purchase. The goal is to gather data on purchase intent.
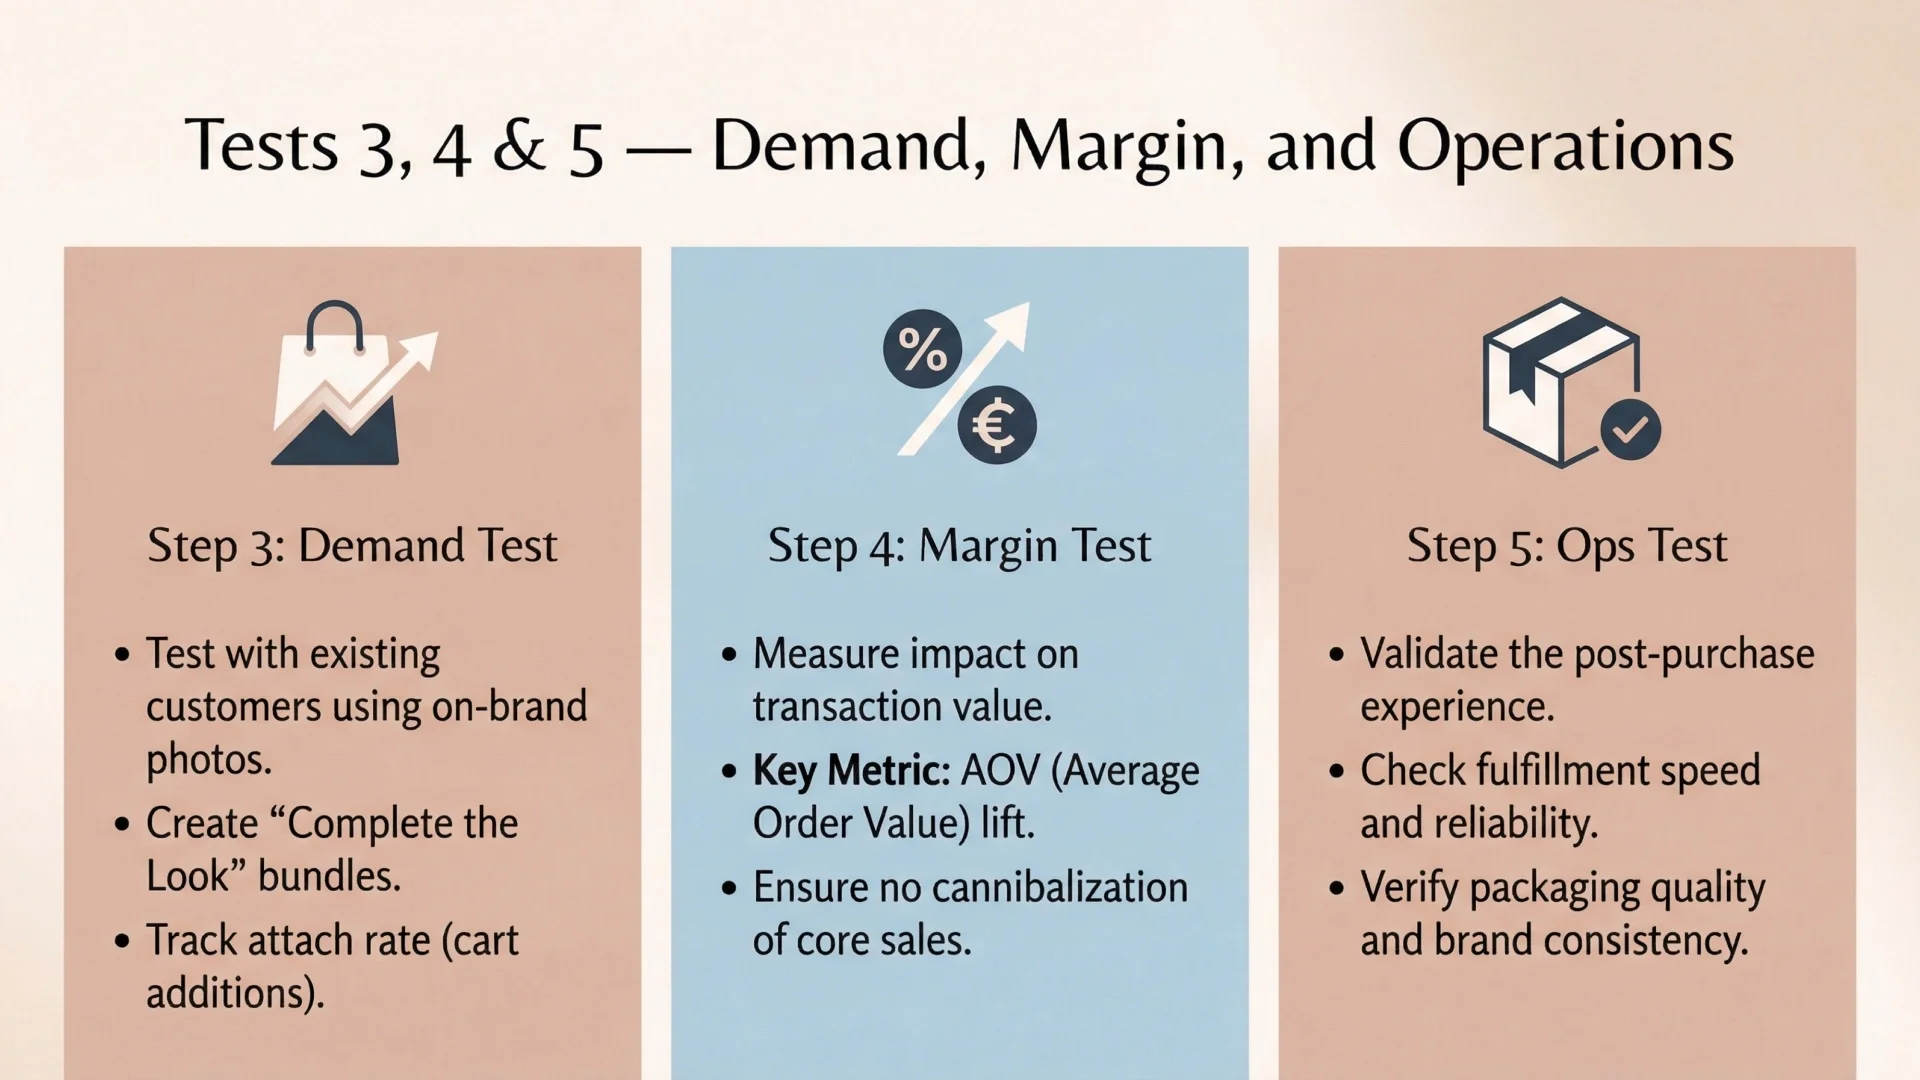
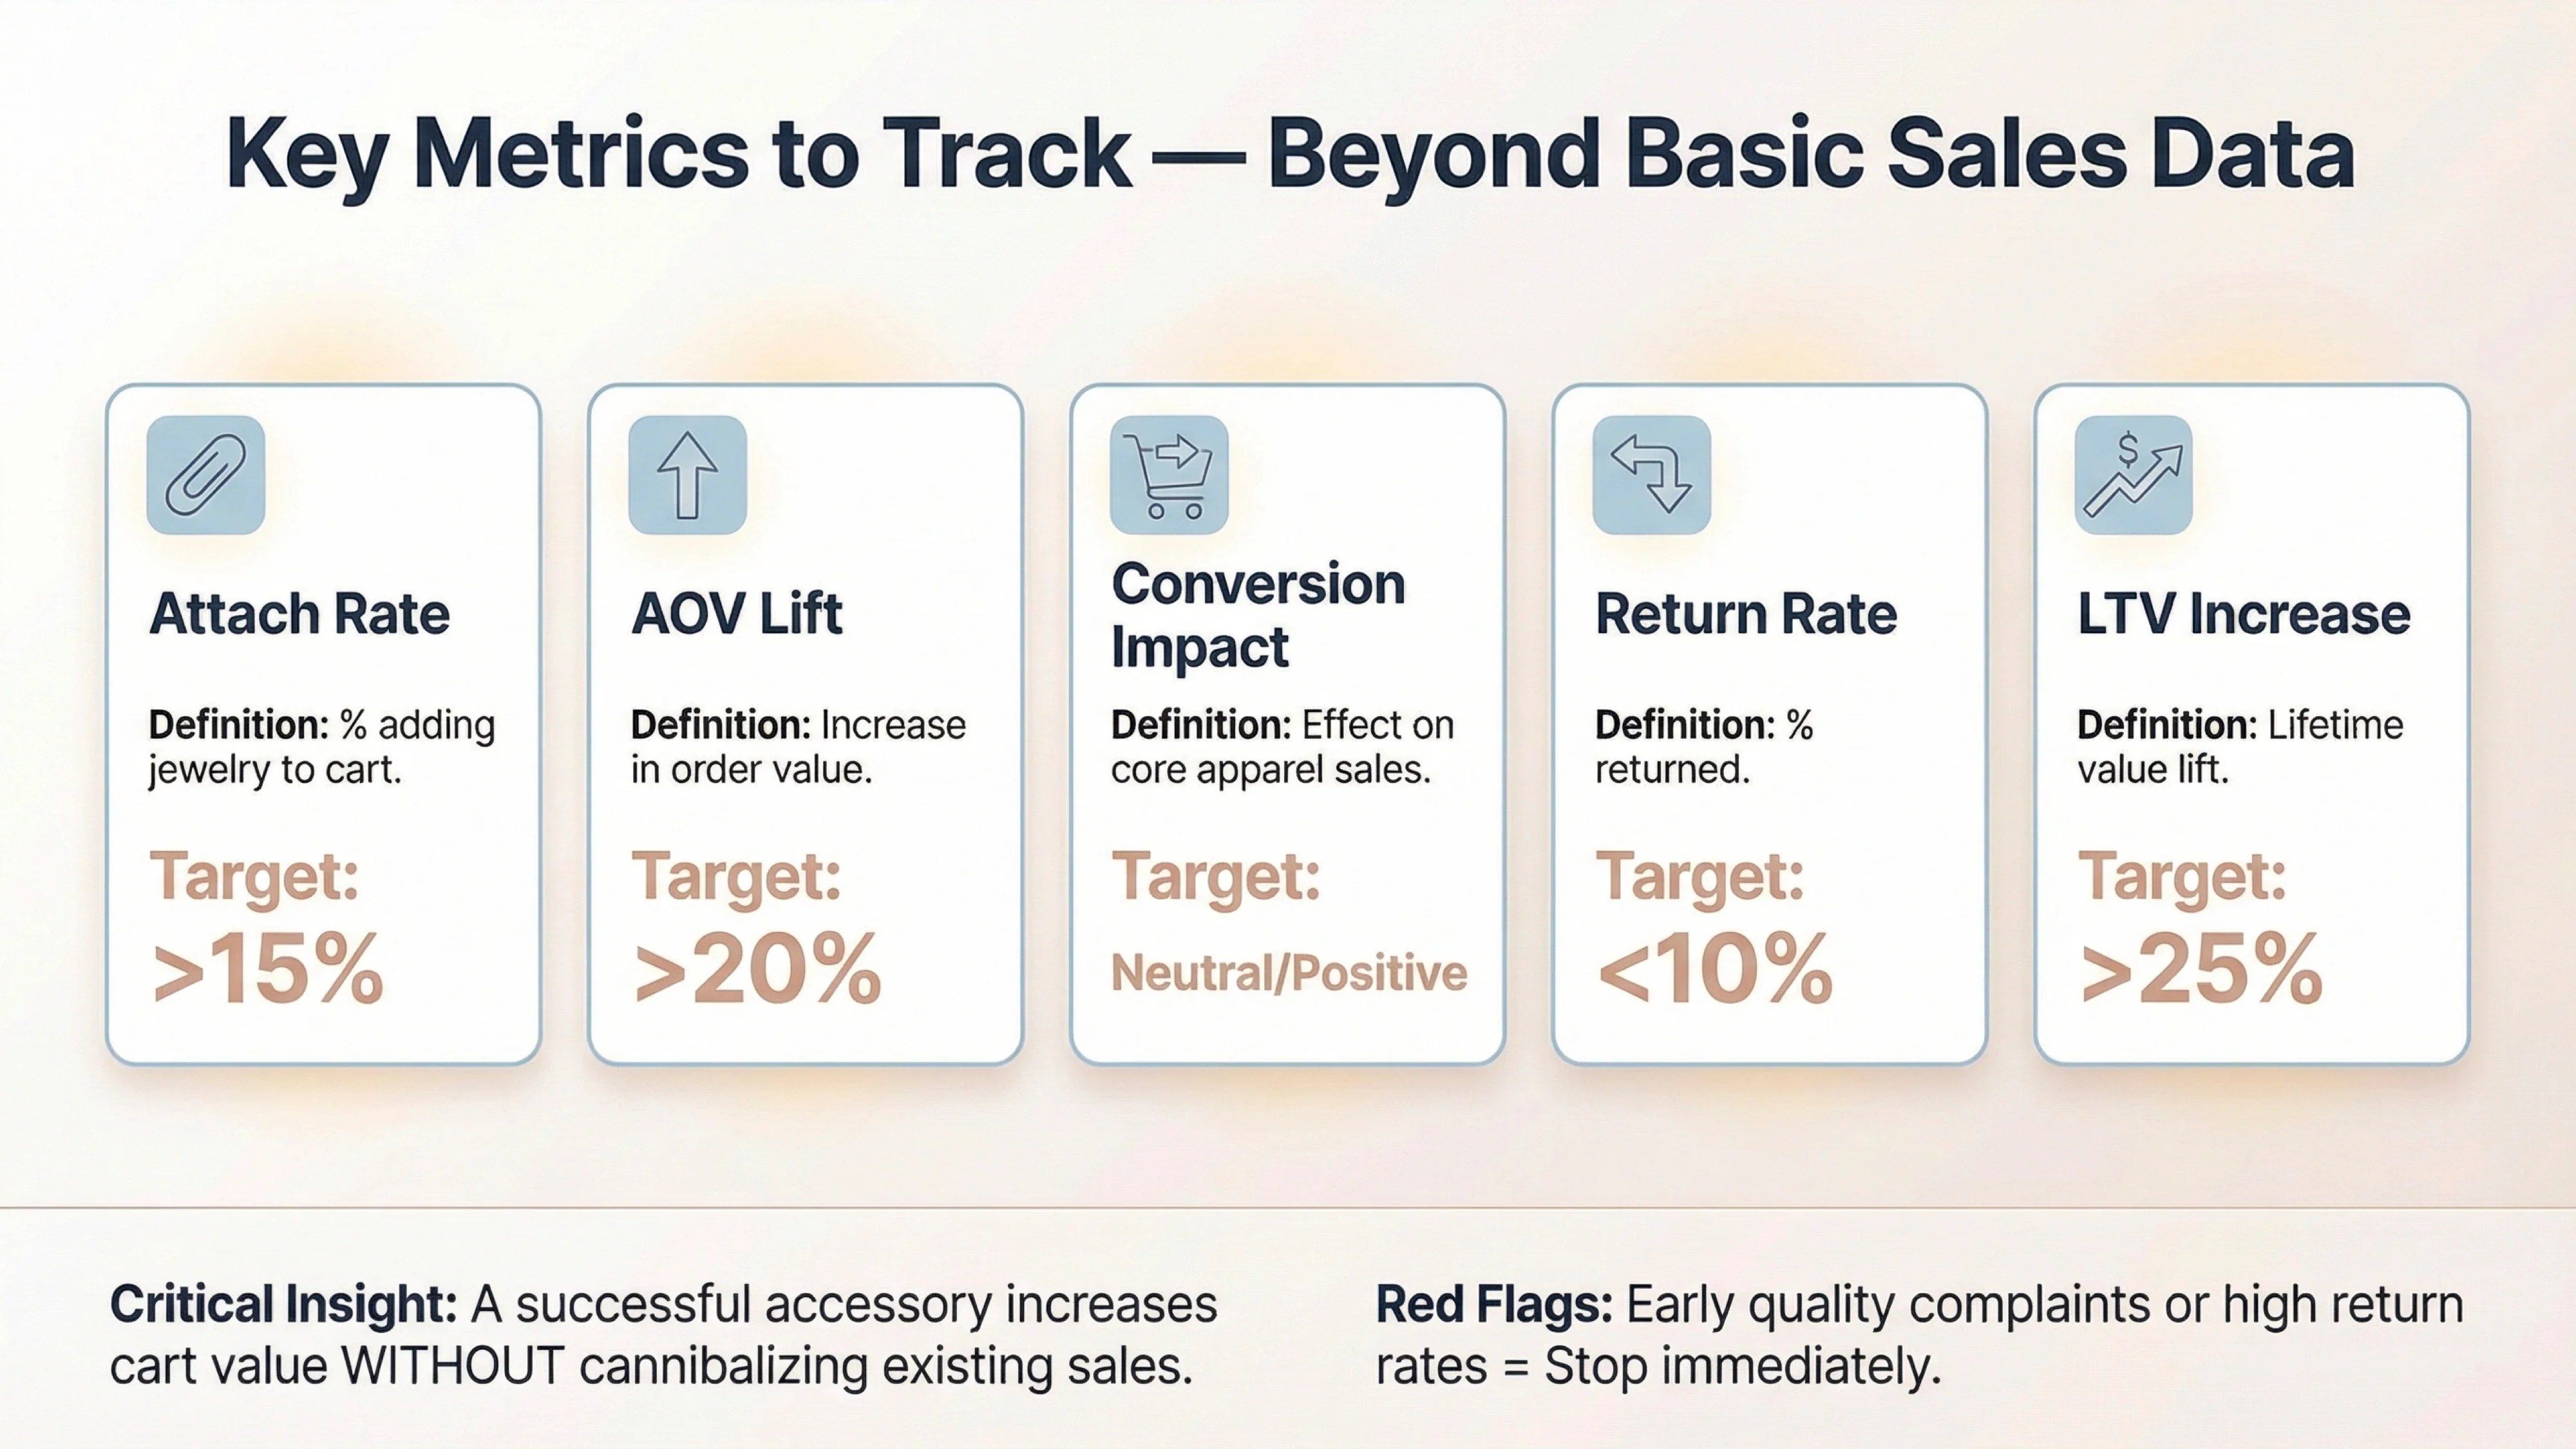
If the demand is there, the next step is to ensure the product is a profitable addition. This isn’t just about the individual product margin; it’s about its impact on your overall transaction value. The key metrics to measure here are Average Order Value (AOV) lift and attach rate. A successful accessory should not only sell but should also increase the total value of the cart without cannibalizing other sales.
How to apply it: During your demand test, closely monitor your analytics. Is the presence of the jewelry add-on increasing the AOV? What percentage of customers who buy a dress also add the necklace? A successful test shows a clear, positive impact on your key transaction metrics. If it doesn’t move the needle, it may not be worth the operational effort, even if it sells.
Finally, if the product passes the first four tests, it’s time to evaluate the operational feasibility. This involves the entire post-purchase experience: fulfillment, shipping times, packaging, and returns. A great product with a terrible fulfillment experience can do more damage to your brand than a bad product. This is where a reliable fulfillment partner becomes critical.
How to apply it: Before you fully launch, place a few test orders yourself. How long does it take to arrive? What does the packaging look like? Is it consistent with your brand’s unboxing experience? A thorough product testing strategy includes evaluating everything from safety and durability to the final packaging [1]. If you’re using a dropshipping partner like Branvas, this step is simplified, as the fulfillment process is already established and optimized for brand-safe delivery.
By following the ZPTL, you create a series of gates that a product must pass through, ensuring that by the time you’re ready to offer it to your entire customer base, you’ve minimized brand risk, eliminated inventory risk, and validated both demand and profitability.
Now that we have the ZPTL framework, let’s walk through the most critical, hands-on part of the process: the photo-first jewelry test. This is the tactical playbook for validating a new jewelry piece in under 24 hours with minimal risk. The goal is to create high-quality, on-brand visual assets that you can use to test demand before you ever commit to inventory.
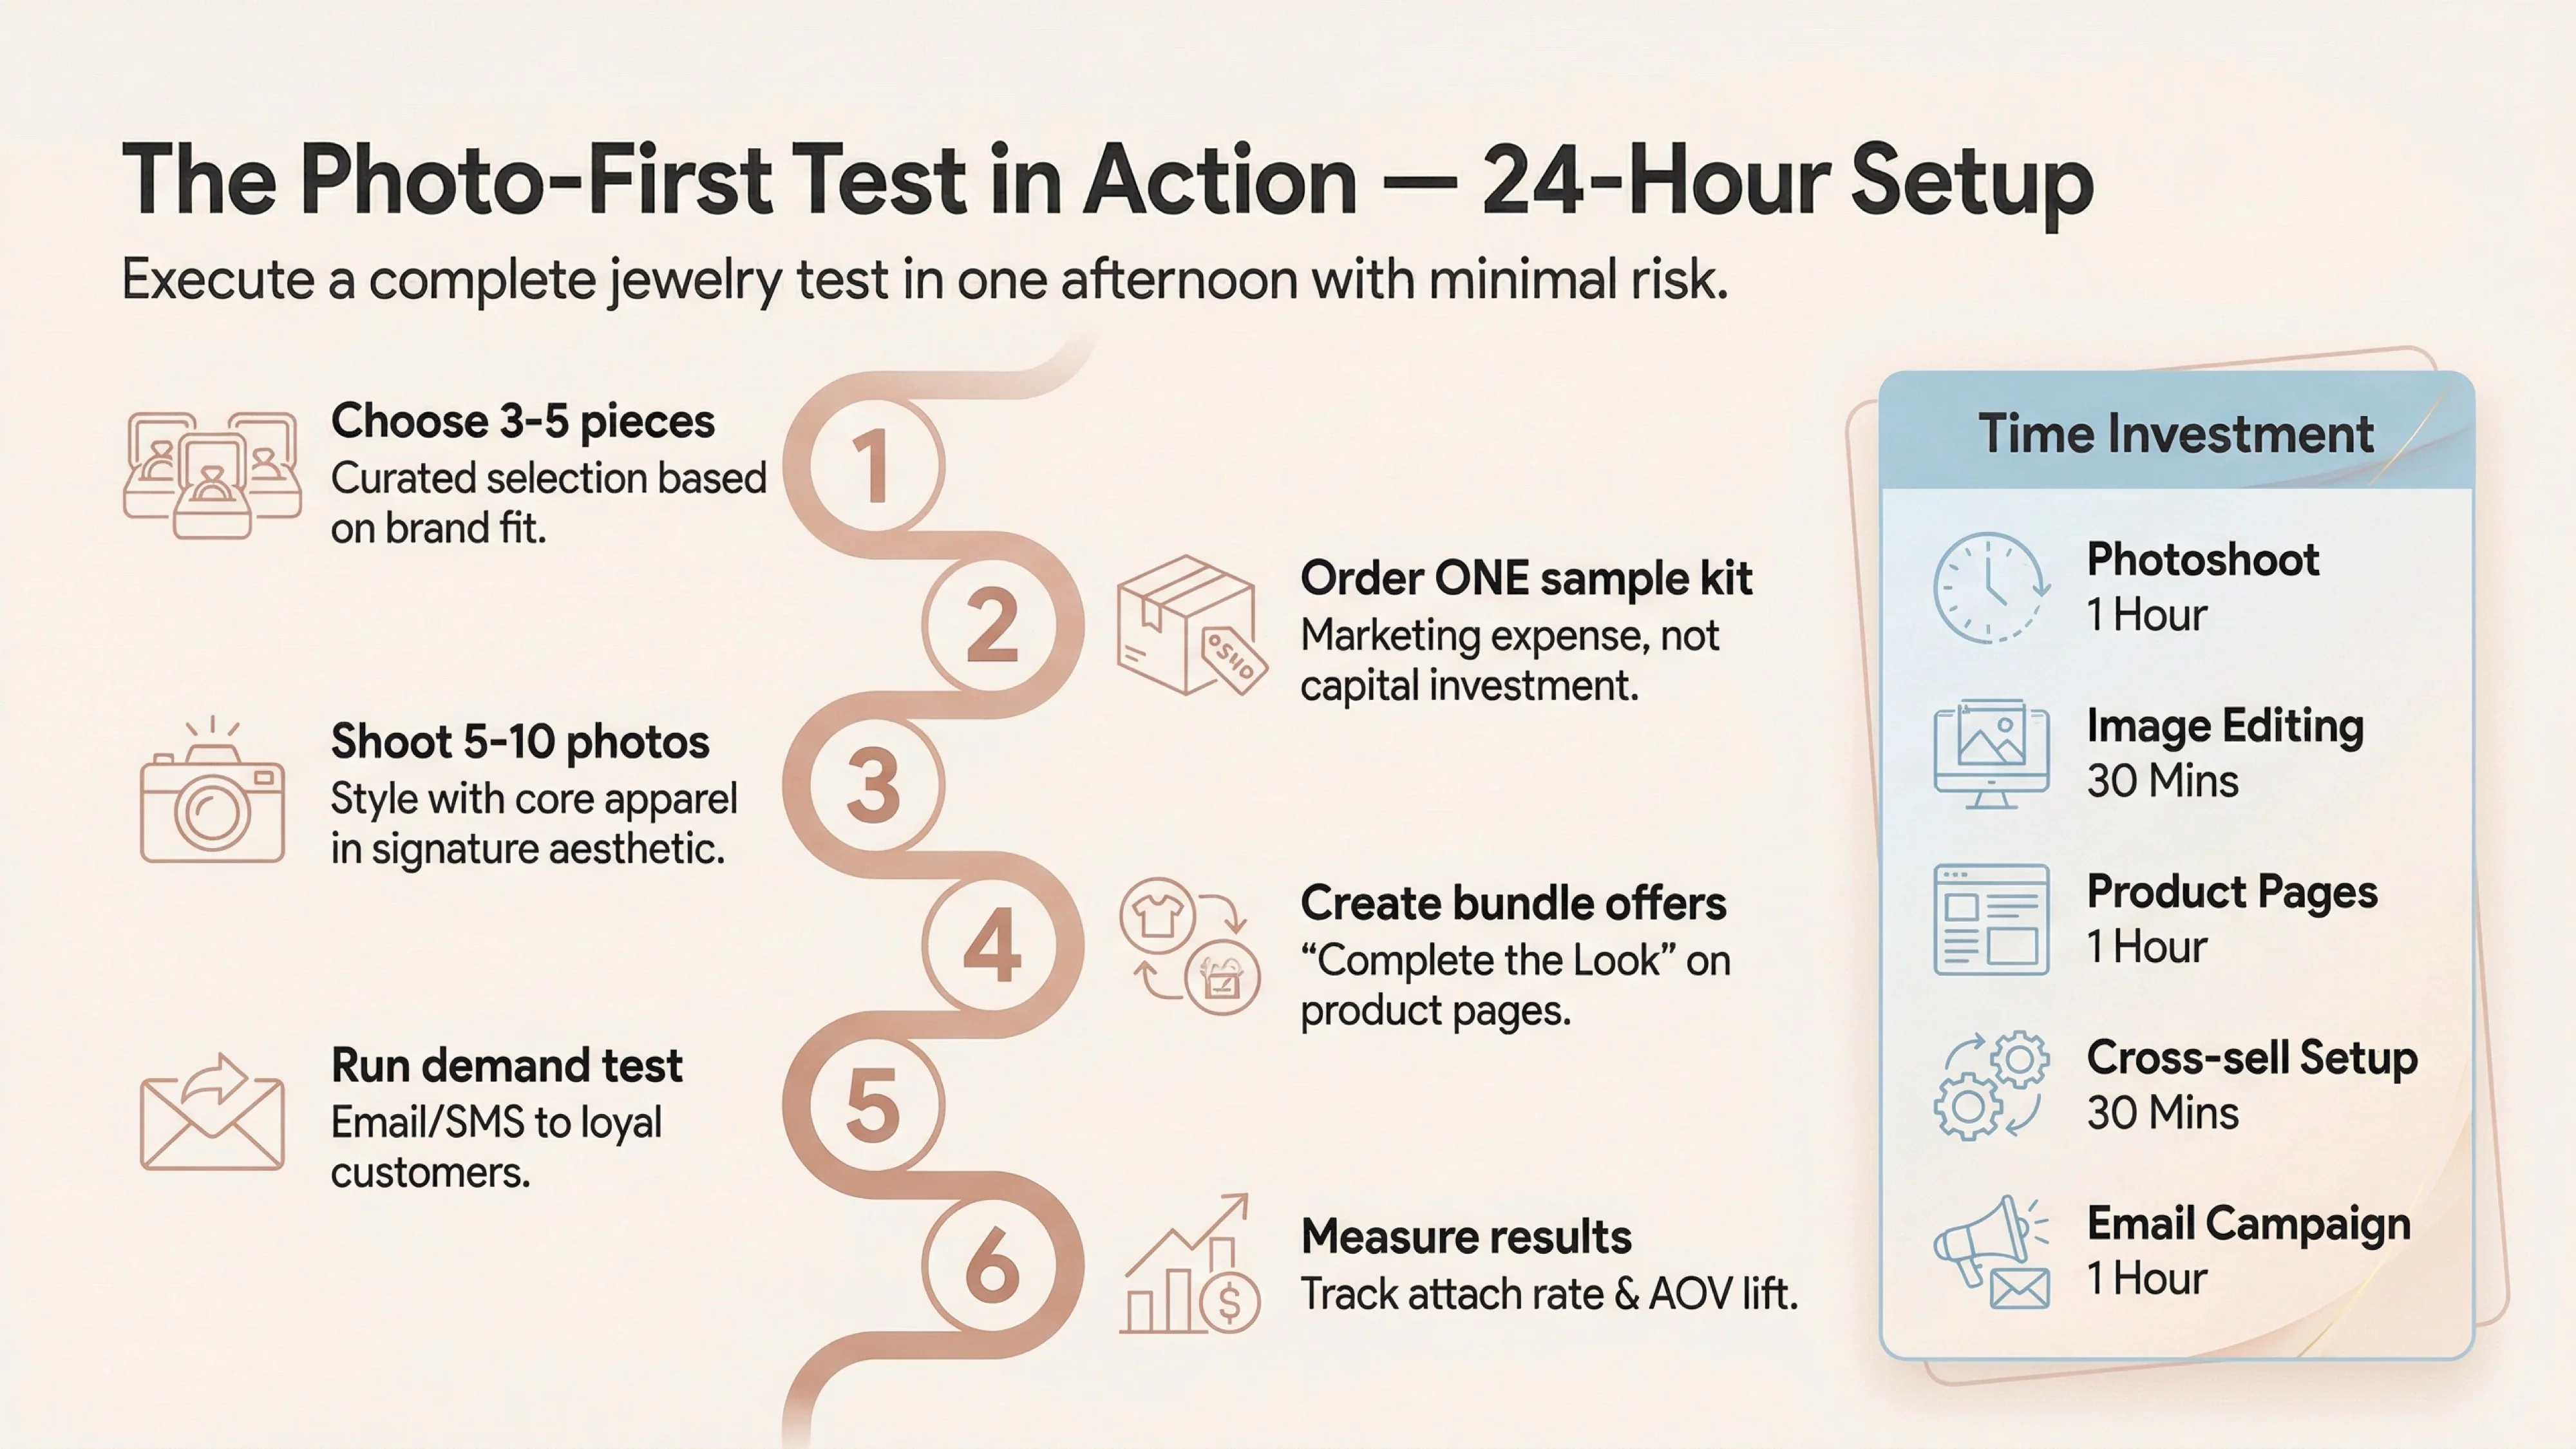
1. Choose 3–5 Jewelry Pieces: Based on your Brand Fit Test, select a small, curated assortment of 3 to 5 jewelry pieces that align with your brand’s aesthetic. Don’t test 50 SKUs; test 5 looks. The goal is to find a style that resonates, not to become a massive jewelry warehouse overnight.
2. Get One Sample Kit: This is the cornerstone of the zero-risk method. Order a single sample kit from a partner like Branvas. This is a non-negotiable step. You are not buying inventory; you are acquiring a tool for a visual test. The cost of a sample kit is a tiny marketing expense, not a capital investment.
3. Shoot 5–10 On-Brand Photos: Once the sample kit arrives, it’s time for the most important step. Style the jewelry with your core apparel items. Photograph your best-selling dress with the necklace, or your go-to blouse with the earrings. Shoot in your signature style, with your own models and lighting. The goal is to create images where the jewelry looks like it has always been part of your collection. Avoid generic, white-background product shots. Show the jewelry in context, as part of a complete look.
4. Create “Complete the Look” Bundle Offers: Using your new photos, create a compelling offer on your product pages. This could be a product bundle (“Buy the Dress, Get 20% Off the Necklace”) or a simple cross-sell recommendation. The key is to present the jewelry not as a standalone item, but as the perfect finishing touch to an outfit your customer already wants.
5. Run a Low-Risk Demand Test: Now, it’s time to see if your customers will bite. You don’t need a massive, site-wide launch. Start with a targeted, low-risk test:
6. Measure the Results: After a few days, it’s time to analyze the data. Look beyond just sales. The key metrics to track are:
Here’s how you can get this entire test up and running in a single day, once your sample kit arrives:
This entire process can be completed in a single afternoon, giving you real-world data on a new product category without any of the traditional inventory risk.
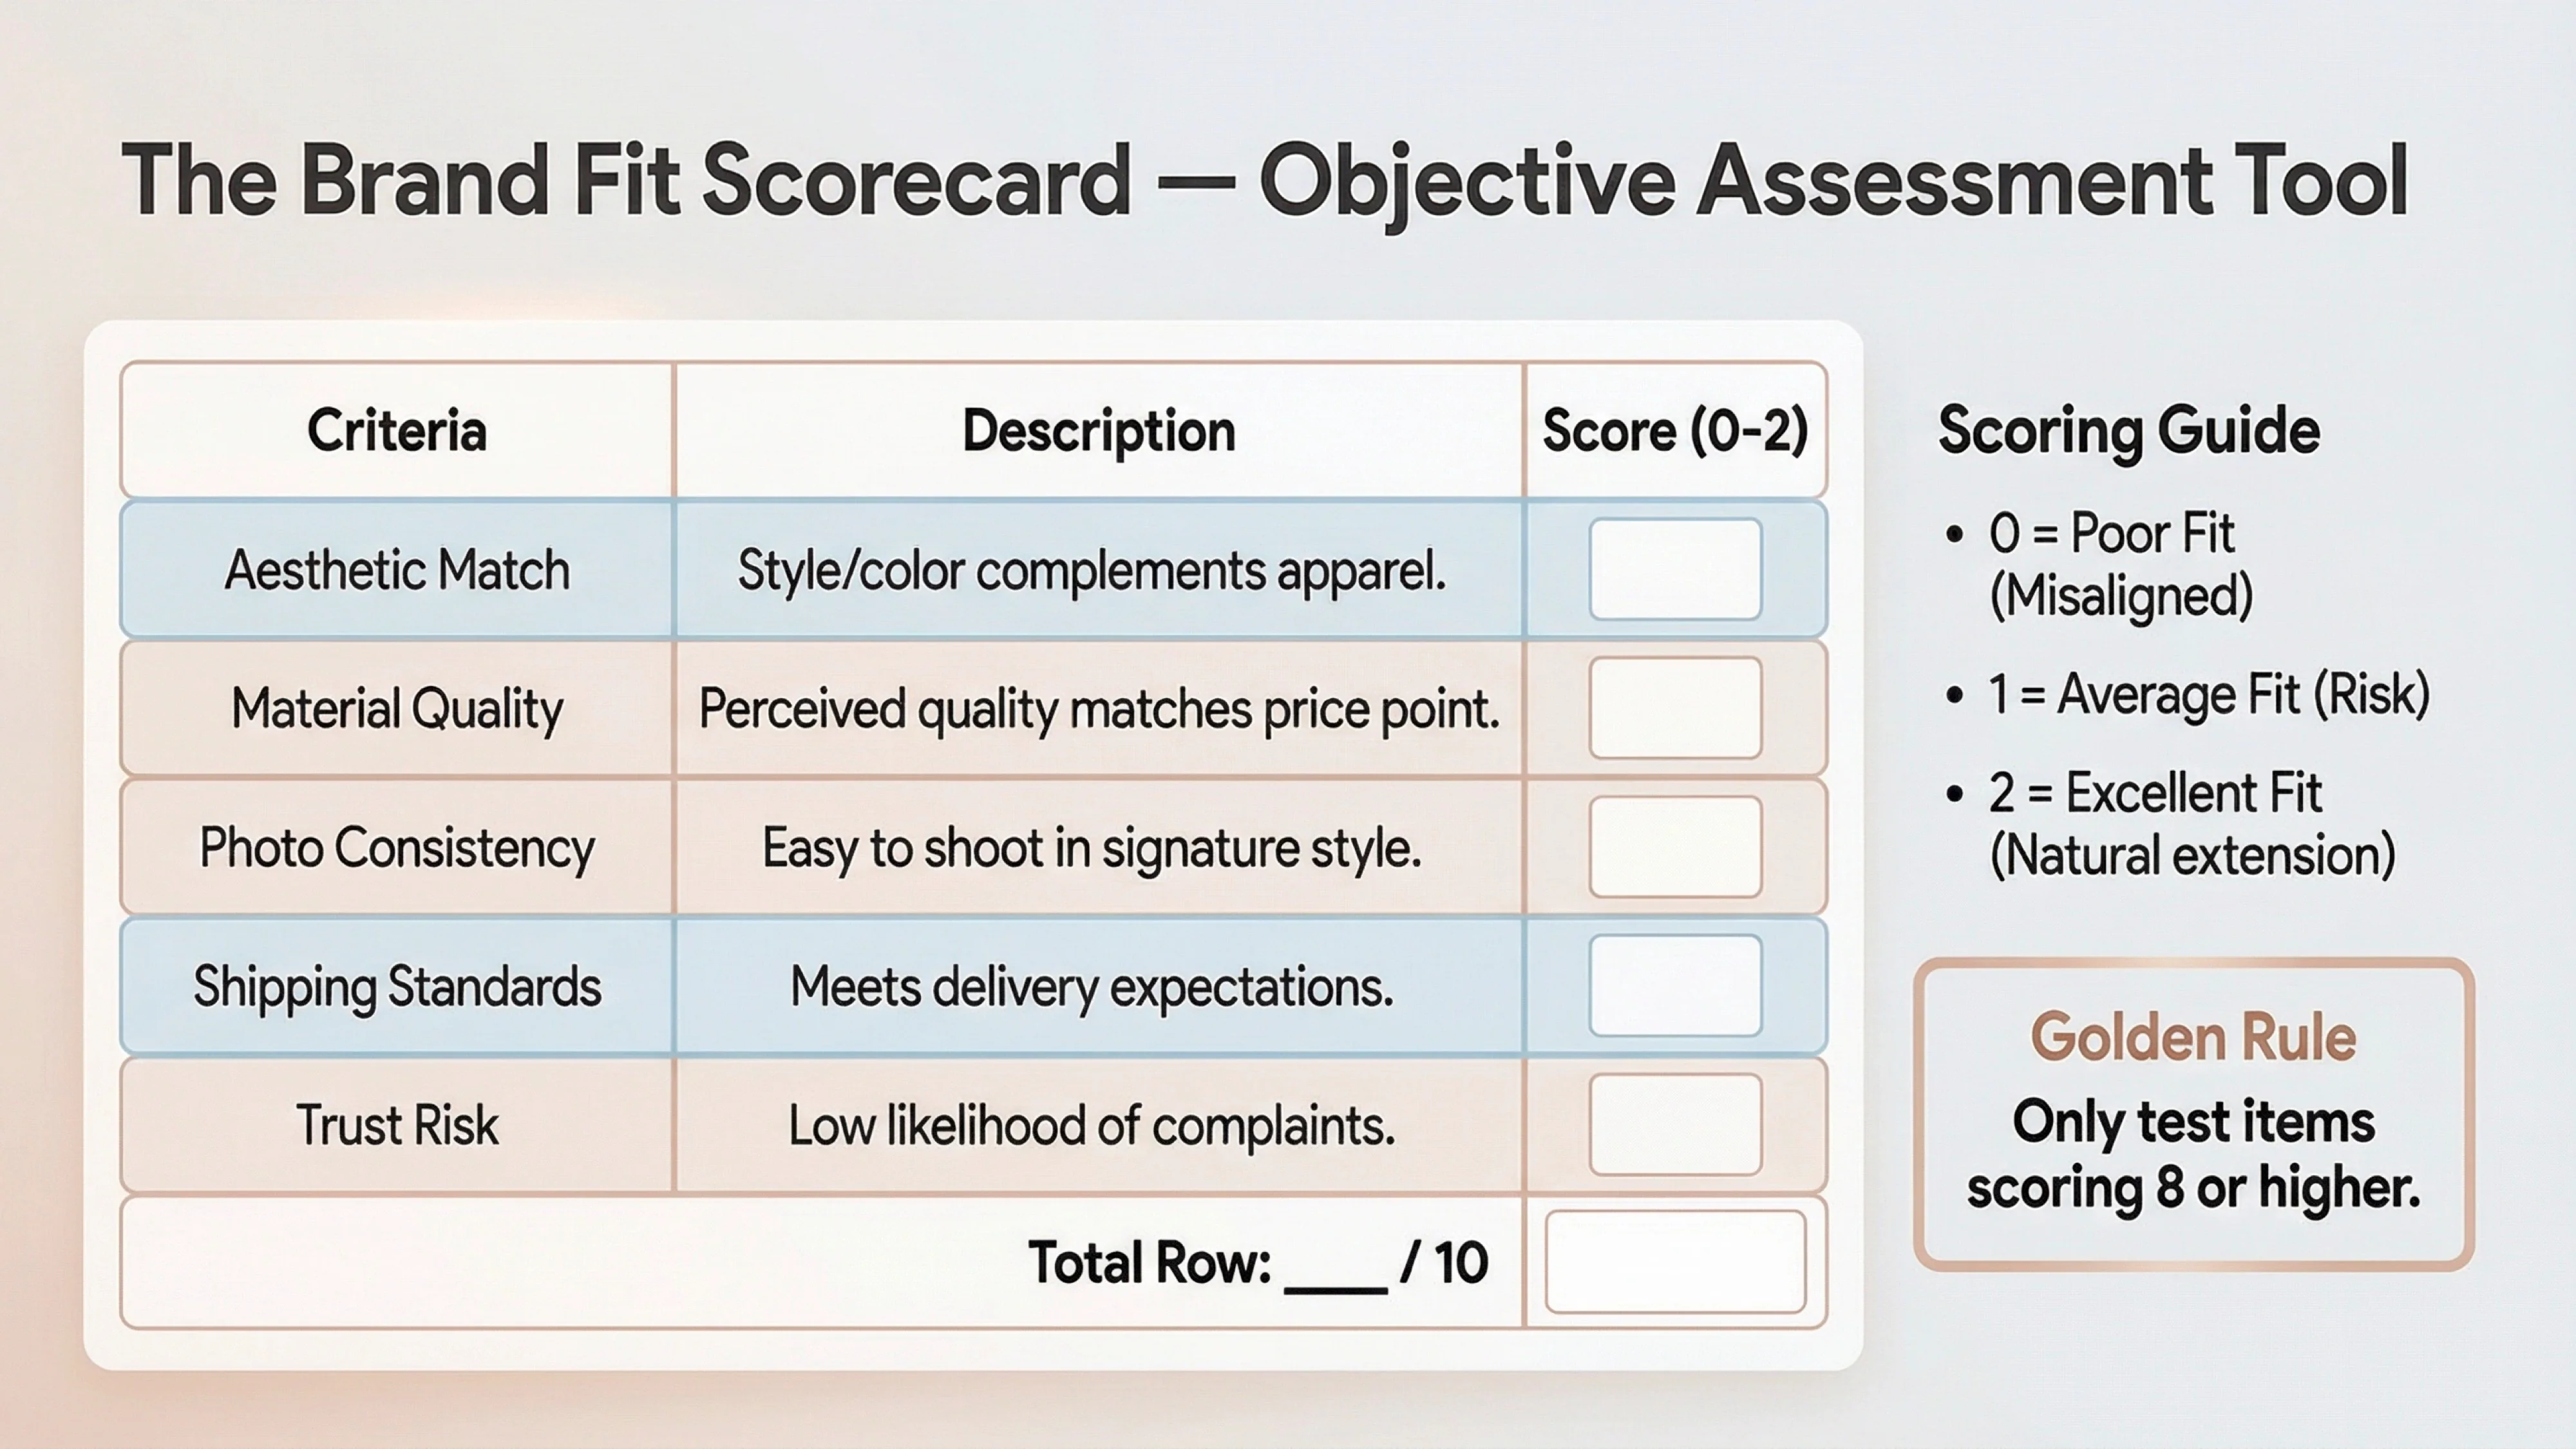
To move from subjective feelings to a more objective assessment, use this Brand Fit Scorecard. It’s a simple rubric designed to help you quantify whether a potential jewelry piece aligns with your brand. The rule is simple: only test items scoring 8 or higher. This isn’t about personal taste; it’s about brand consistency. A lower score indicates a higher risk of brand dilution, even if the product itself is appealing.
|
Scorecard Criteria |
Description |
Score (0-2) |
|---|---|---|
|
Aesthetic Match |
Does the style, shape, and color of the jewelry directly complement your core apparel collection? |
|
|
Material Quality Perception |
Does the material (or its appearance) look and feel consistent with the price point of your apparel? |
|
|
Photo Consistency |
Can you easily photograph this item in your brand’s signature style, using your existing lighting and models? |
|
|
Shipping Expectations |
Can the item be shipped and delivered in a manner that meets or exceeds your customers’ current expectations? |
|
|
Customer Trust Risk |
How likely is this product to generate quality complaints, returns, or negative reviews that could damage brand trust? (0=High Risk, 2=Low Risk) |
|
|
Total Score |
** / 10** |
How to Use the Scorecard:
This simple tool forces you to think critically about each potential product from a brand-risk perspective. It’s a crucial step in avoiding the “cheap AliExpress junk” that can so easily tarnish a carefully built brand image.
In the world of ecommerce, the conventional wisdom for testing new products, especially in dropshipping, is to run traffic to a multitude of supplier-provided images and see what sticks. This is a numbers game, and it’s a game that apparel brands are destined to lose. The contrarian truth that we’ve seen consistently work for established brands is this: the best and fastest product test is a visual test, not a supplier test.
This is because, in fashion, consumers don’t just buy a product; they buy into an aesthetic, a story, and a feeling. They buy with their eyes. Trust, which has become the ultimate differentiator in a crowded 2026 marketplace, is established visually long before a customer ever adds an item to their cart [2]. When you use a generic, soulless supplier image, you are not just testing a product; you are testing your customers’ tolerance for brand inconsistency. And for a discerning apparel customer, that tolerance is zero.
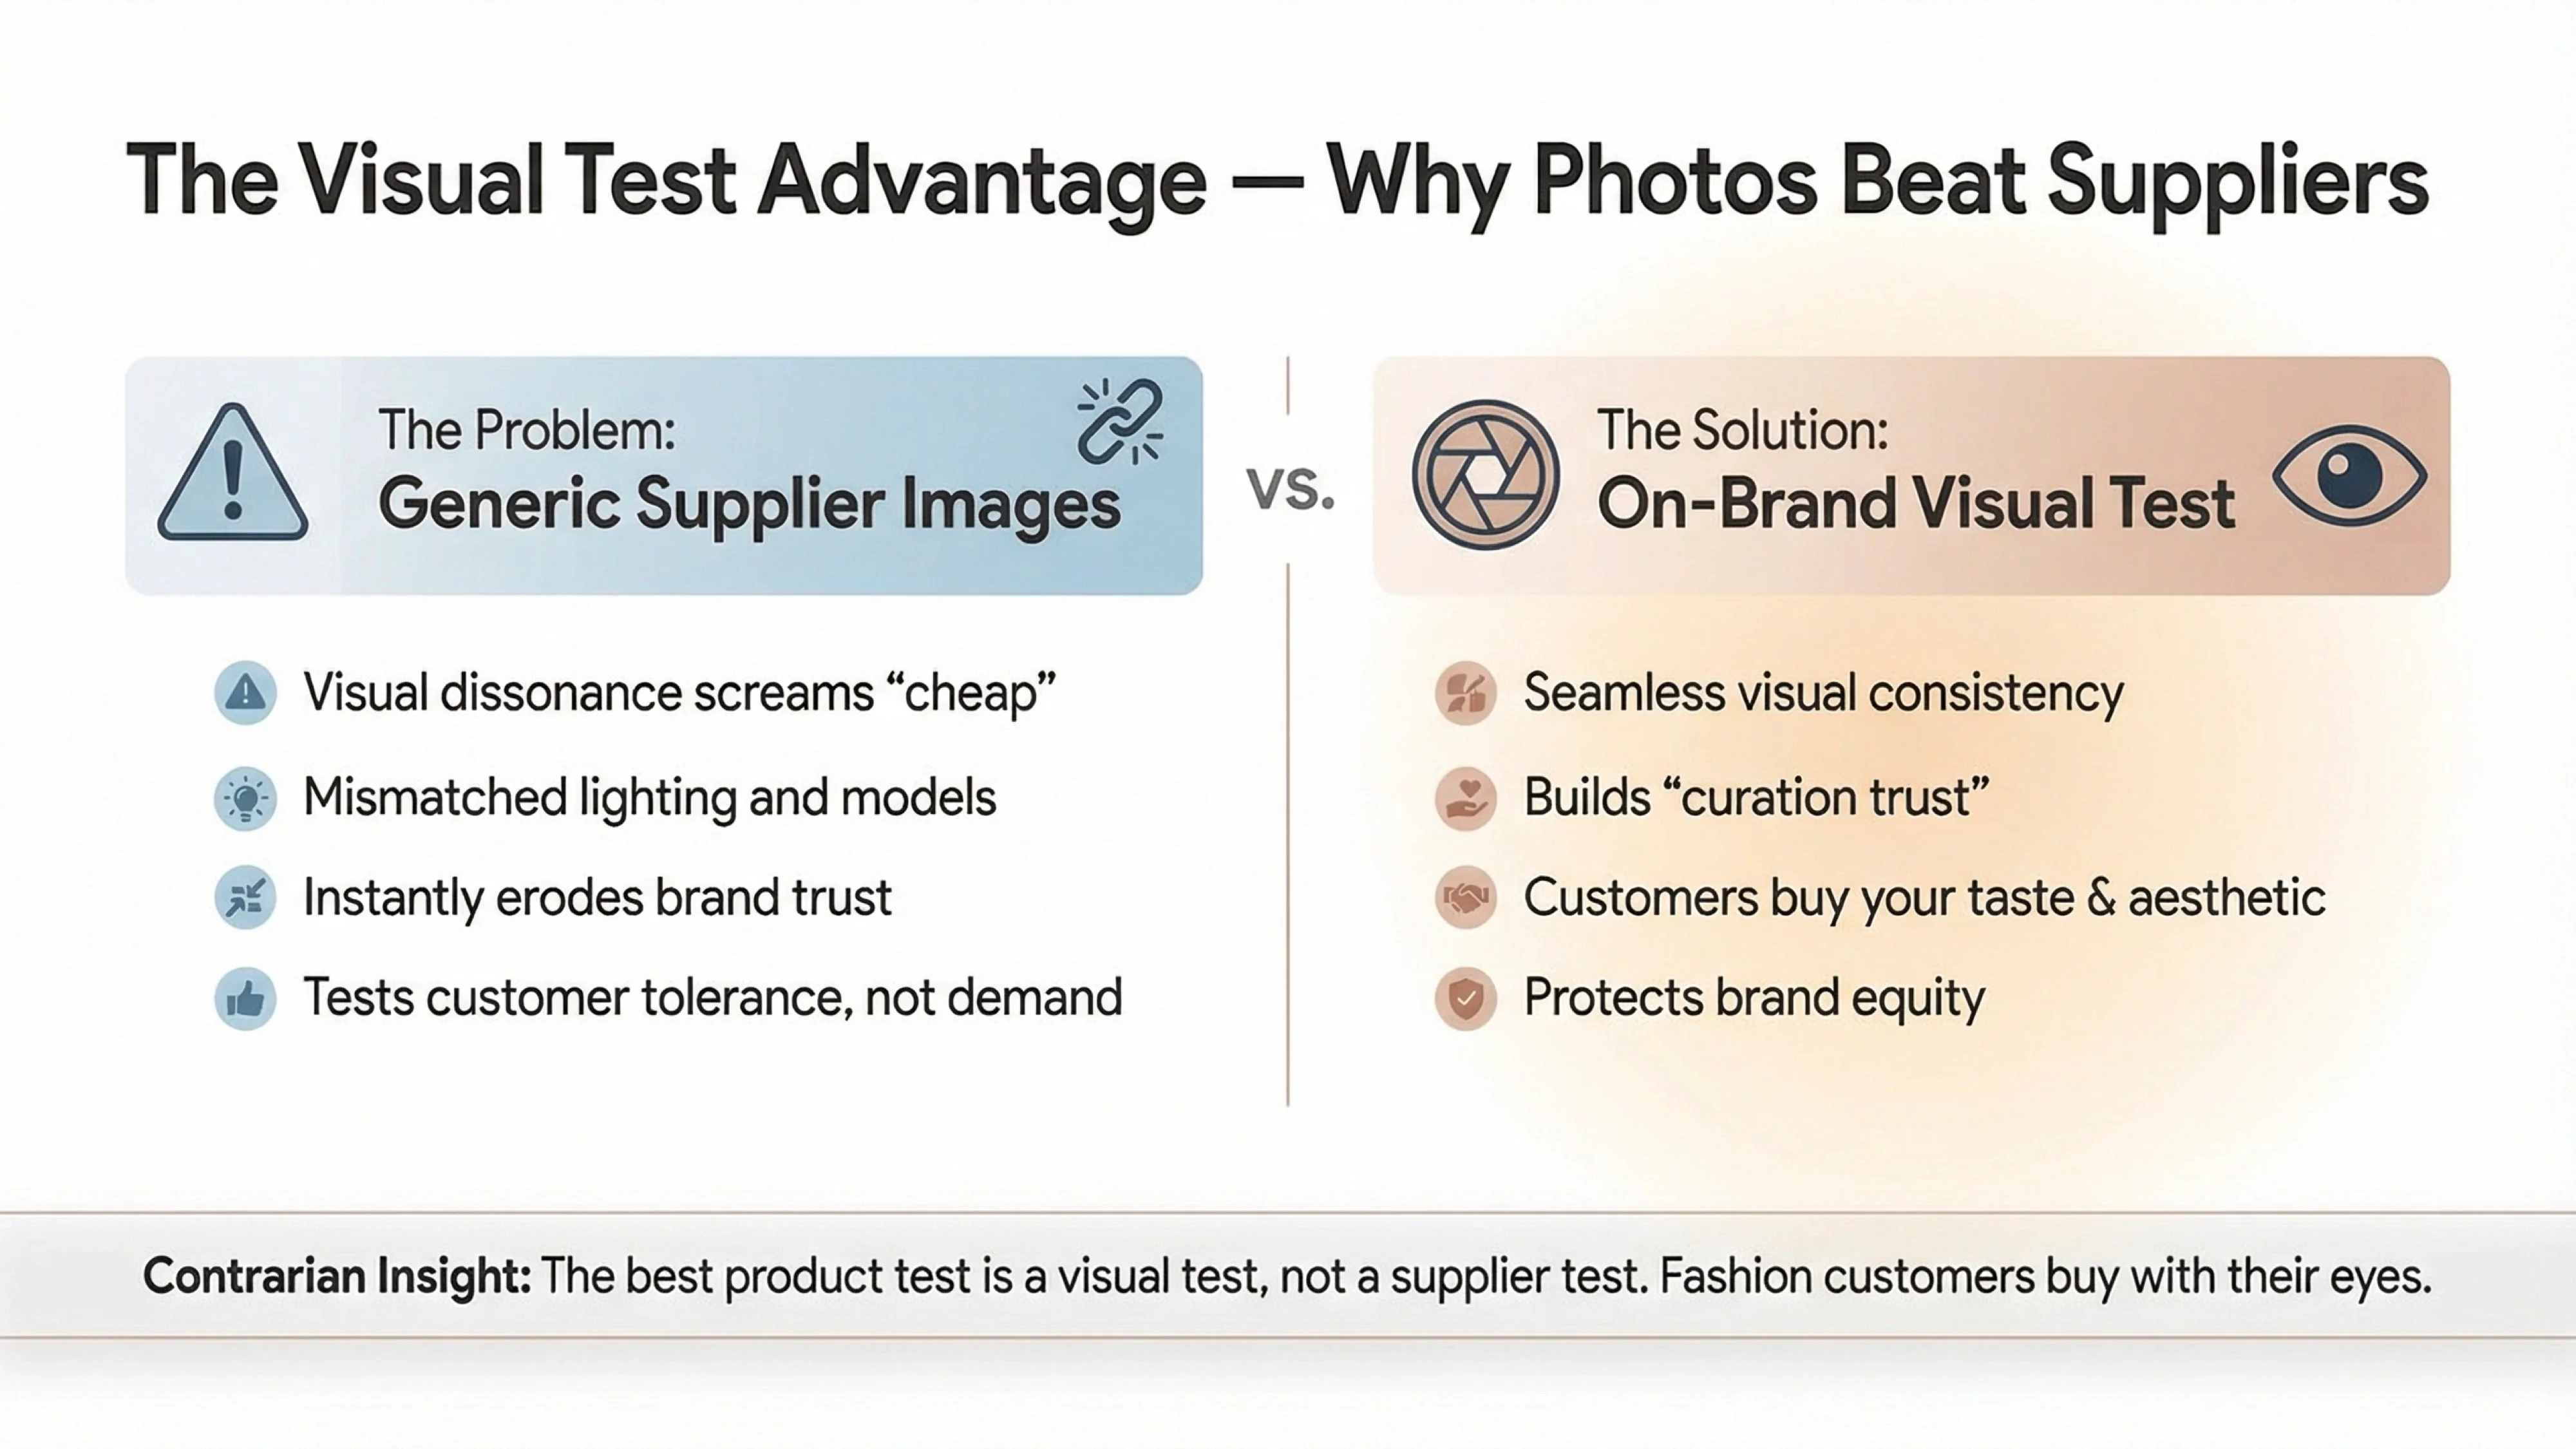
The very reason the “cheap AliExpress junk” fear is so prevalent is because of a visual mismatch. The product photos look out of place, the lighting is different, the models don’t match your brand’s vibe. This visual dissonance screams “low quality” and “not from here,” immediately eroding the trust you’ve spent years building. A 2026 report on the state of fashion emphasizes that brands are increasingly moving upmarket by focusing on “product quality and standout experiences” [4]. A visual test is the first and most critical step in creating that standout experience. It ensures that any new product you introduce feels like a natural extension of your brand, not a random, tacked-on extra.
Furthermore, a visual-first approach protects you from what is known as “Trend Loyalty” – shoppers who are loyal to a viral moment, but not to the brand itself [3]. By ensuring that every product is filtered through your brand’s unique visual lens, you are building a deeper, more resilient form of loyalty. You are teaching your customers to trust your curation and your taste, not just to chase the next fleeting trend. This is how you build a brand that lasts, and it all starts with a simple photo test.
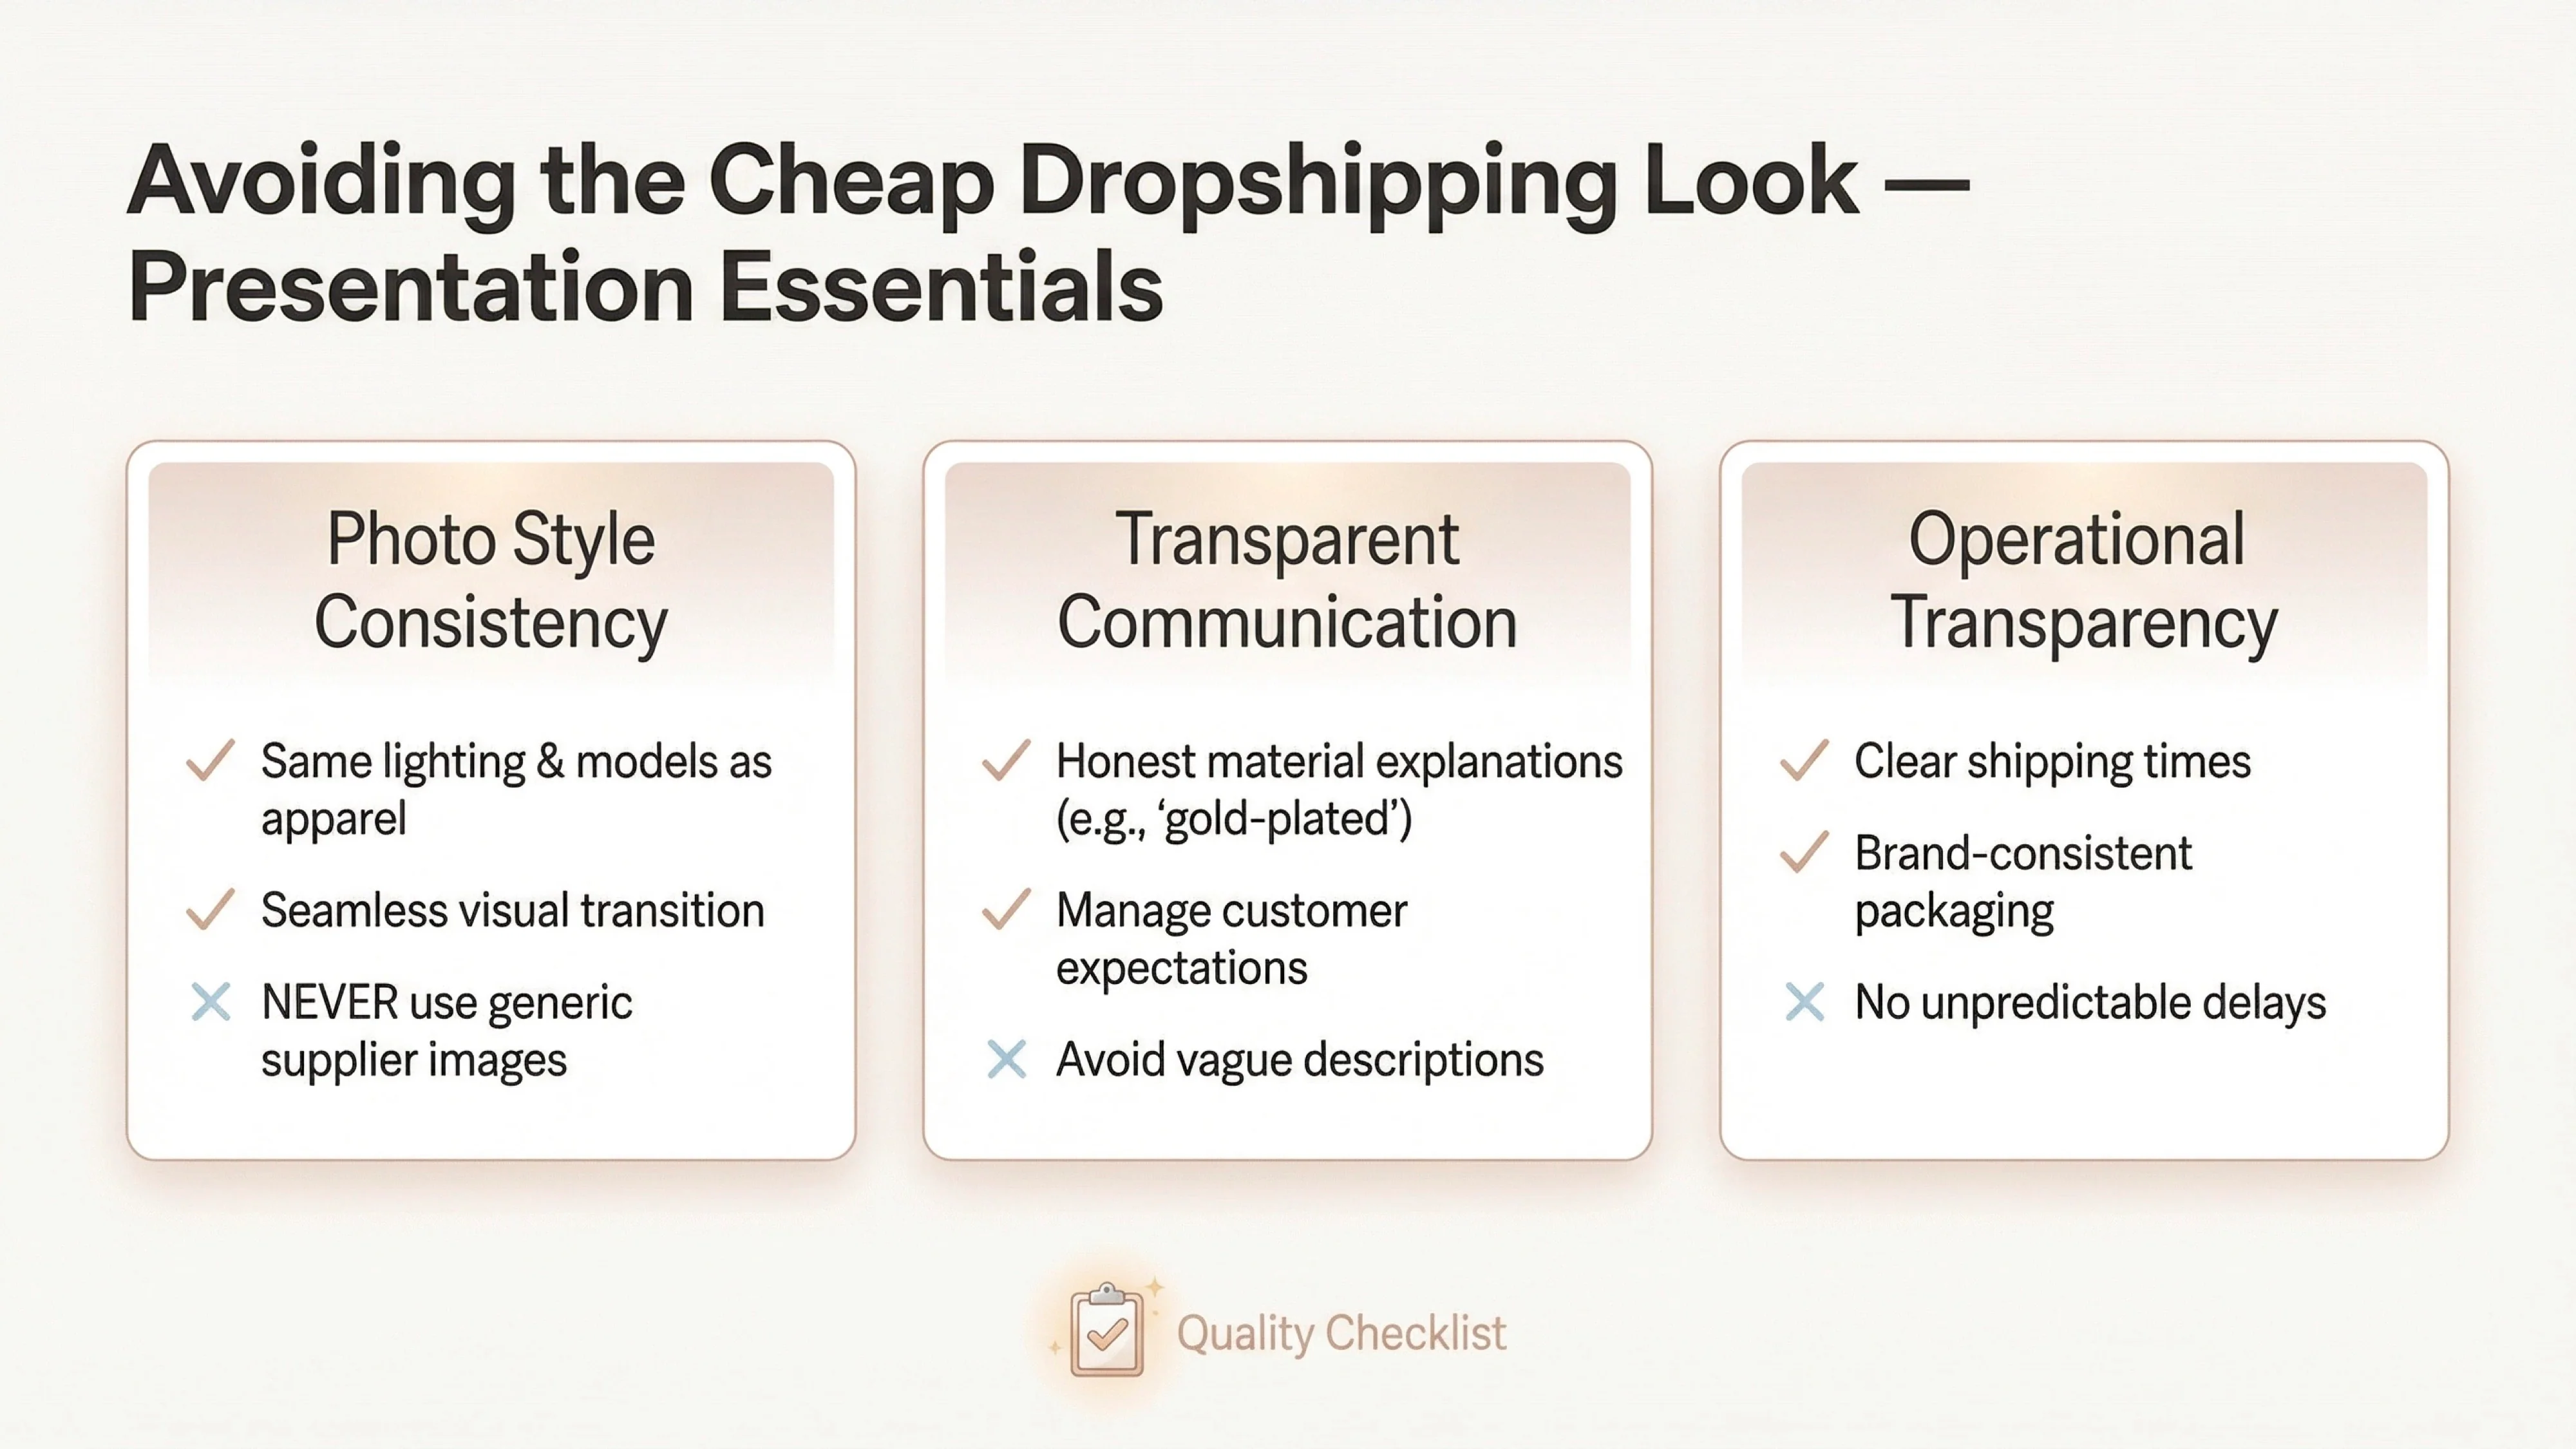
Even with the right product, poor presentation can make high-quality jewelry look cheap. Avoiding the generic “dropshipping” aesthetic is critical for maintaining your brand’s premium perception. Here are actionable tips to ensure your new jewelry additions look like a curated part of your collection, not a last-minute add-on.
At the heart of the zero-risk testing method is a simple, powerful tool: the sample kit. The entire process we’ve outlined hinges on your ability to conduct a visual test before committing to inventory, and the sample kit is what makes that possible. It’s a concept we’ve built our entire model around at Branvas, and it’s summed up in this simple mantra:
“Order one Branvas sample kit. Take a photo of your dress with our necklace. If it sells, fulfill with us. If not, you lost nothing.”
This single sentence encapsulates a fundamental shift in how apparel brands can and should approach category expansion. Let’s break down why this sample-kit method is so effective at eliminating brand risk.
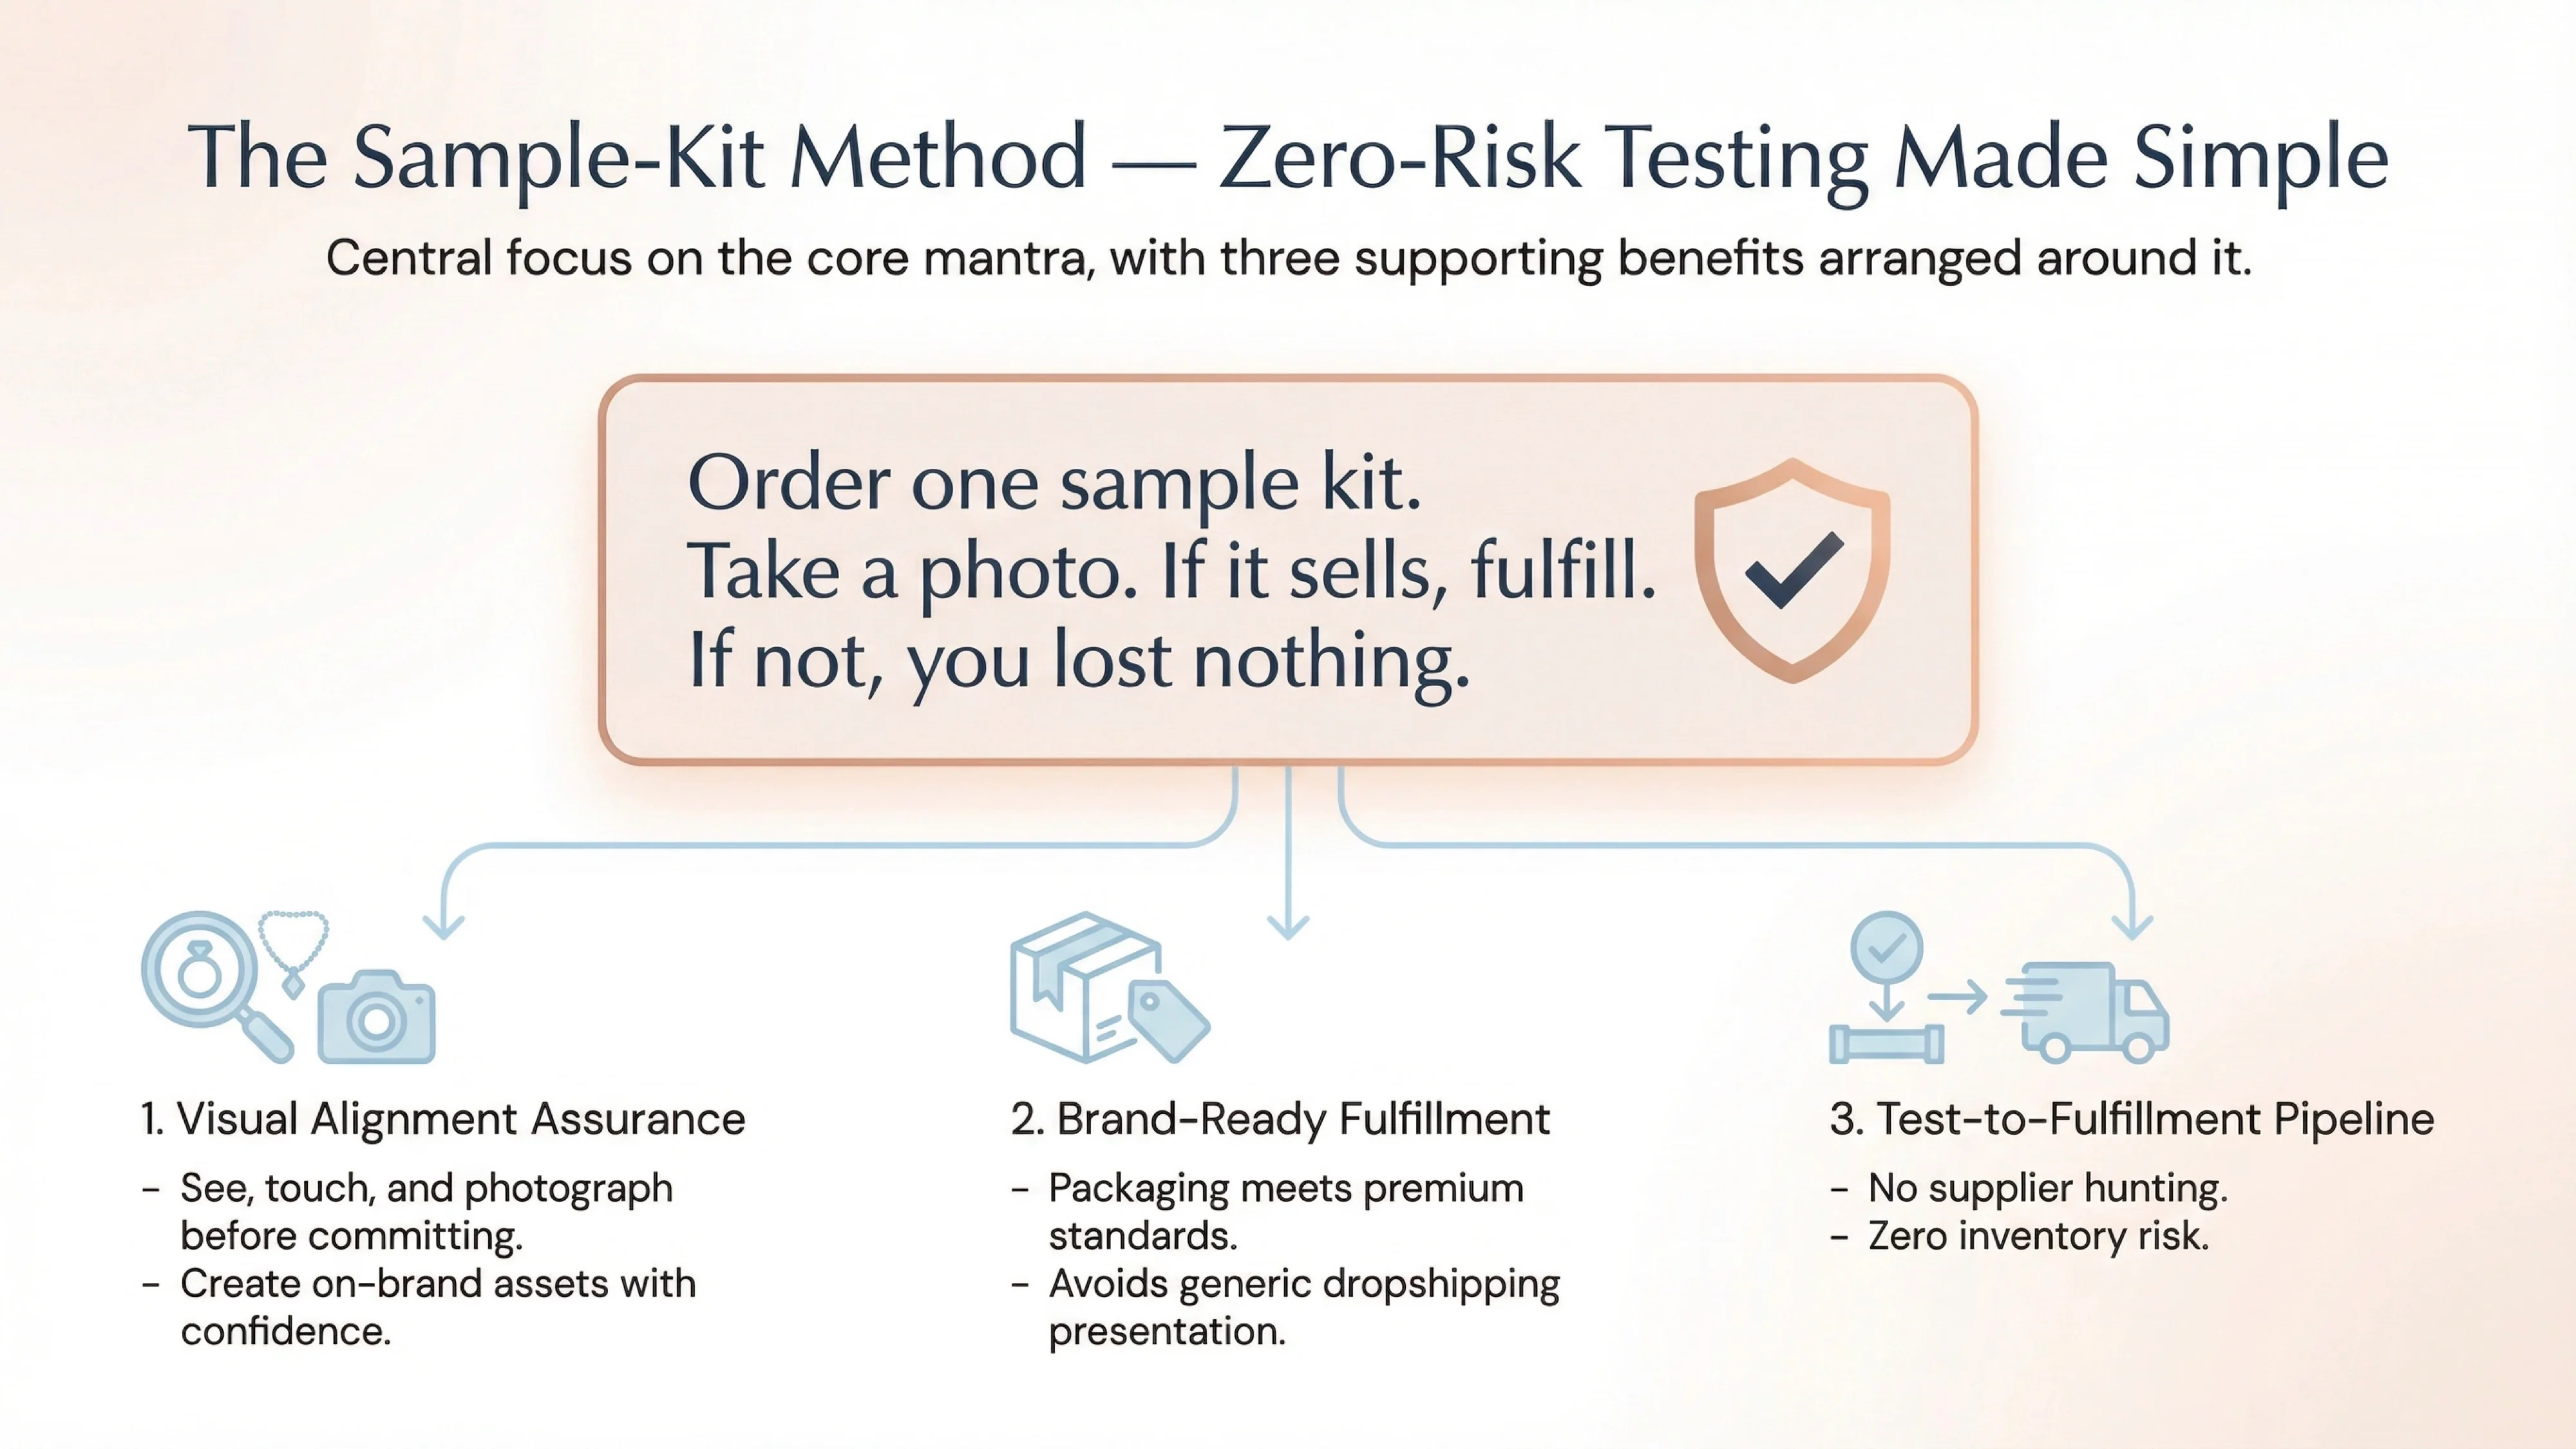
First and foremost, samples reduce brand risk by ensuring visual alignment. As we’ve discussed, the biggest danger to your brand is a visual mismatch. A sample kit allows you to see, touch, and, most importantly, photograph the product in your own environment. It empowers you to create the on-brand assets that are essential for a successful test. You are no longer guessing what a product will look like; you are confirming it.
Second, Branvas is designed to support a brand-ready presentation. We understand that your customers expect a cohesive experience. Our fulfillment process is optimized for brand-safe delivery, ensuring that the packaging and unboxing experience meet the standards of a premium apparel brand. This avoids the common dropshipping pitfall of a product arriving in a generic, unbranded package that screams “third-party supplier.”
Third, the sample-kit method provides a seamless transition from testing to fulfillment. If your photo-first test is successful and the demand is validated, you don’t need to go searching for a supplier or figure out logistics. The fulfillment pipeline is already in place. You simply turn on the ability for customers to purchase, and we handle the rest. This completely avoids the operational headaches and inventory risk of buying in bulk.
Ultimately, this method allows you to escape the supplier roulette that plagues so many businesses. You are not placing a blind bet on a container of unknown goods from an overseas supplier. You are conducting a small, controlled, and highly effective marketing test. If you want a brand-safe way to test jewelry, Branvas can help you do it with confidence and without the risk.
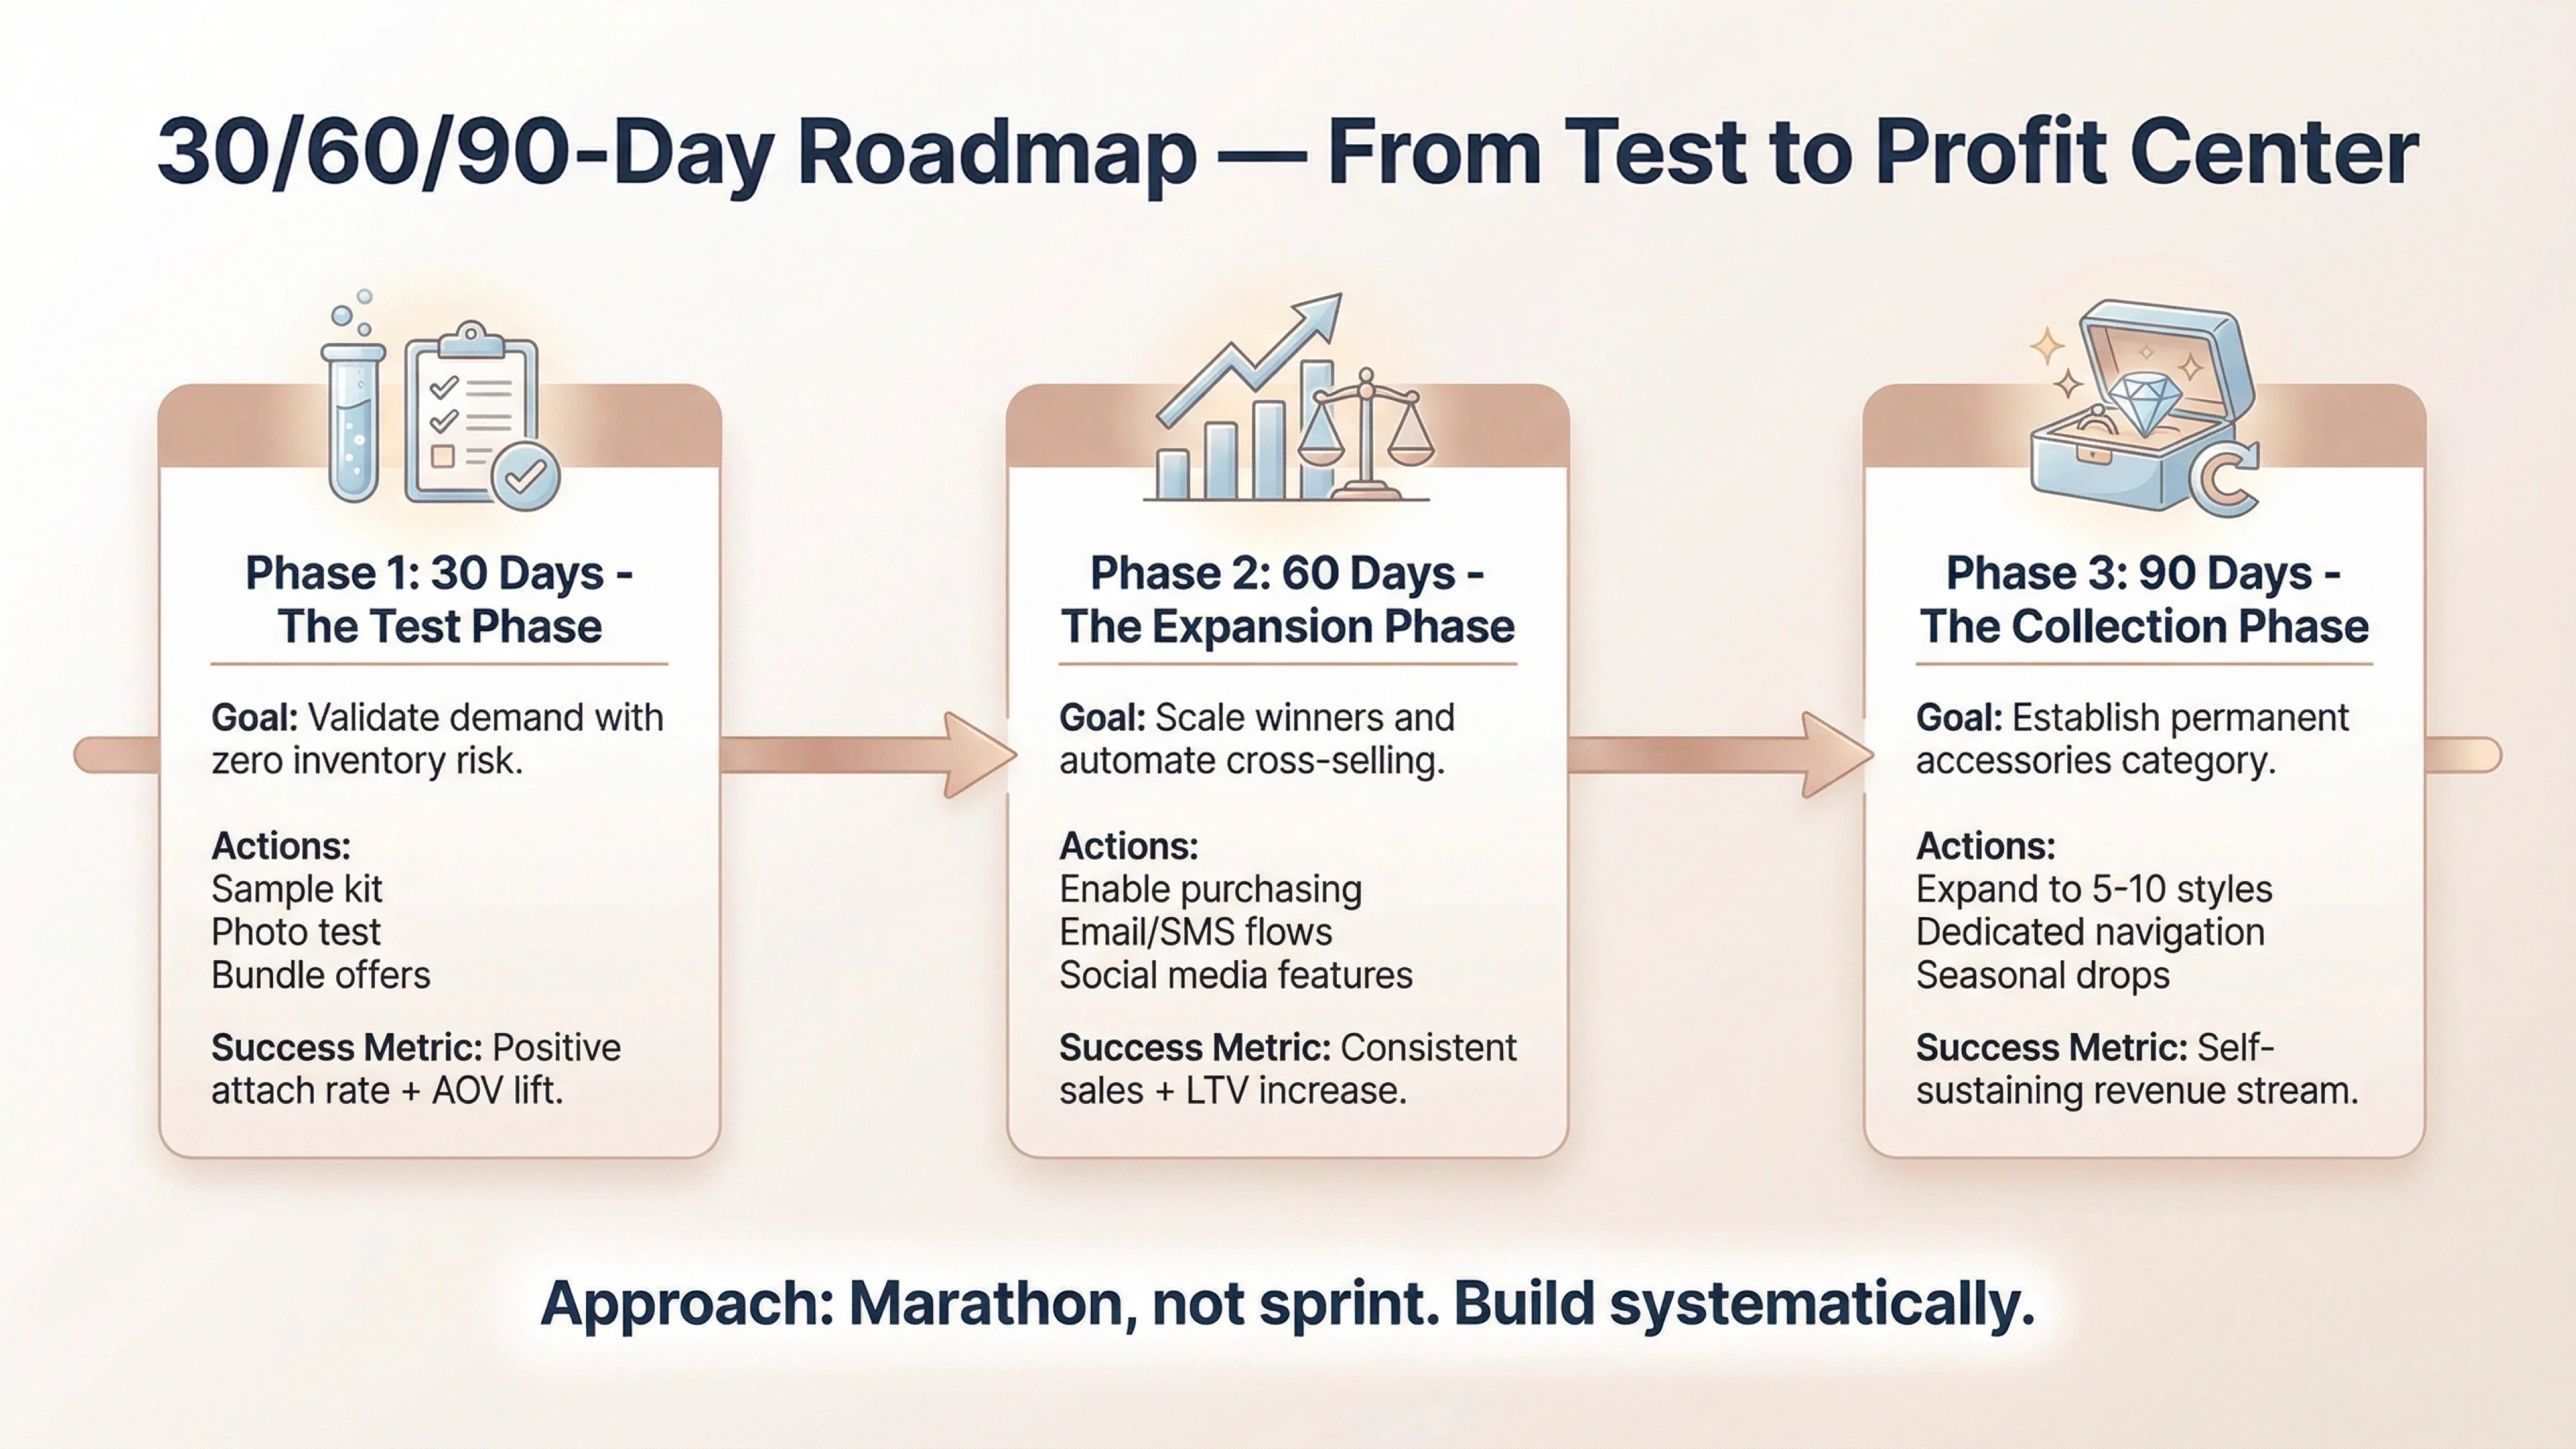
Adding a new category is a marathon, not a sprint. Here is a realistic roadmap for integrating jewelry into your apparel store as a sustainable profit center.
The best way to test dropshipping test products, especially for an established brand, is to use a brand-centric, visual-first approach. Instead of testing dozens of items with generic supplier photos, order a single sample of a well-vetted product. Use it to create high-quality, on-brand photography that you can use to gauge true customer demand through pre-sells or bundle offers.
You can test jewelry without inventory by using the “sample-kit method.” Order one sample piece, style it with your apparel, and conduct a photo shoot. Then, use these on-brand images to create a product page and offer the item as a cart add-on or a “complete the look” bundle to validate demand before committing to a fulfillment partner.
Avoiding the “cheap” look comes down to presentation and transparency. Always create your own high-quality, consistent photography and never use generic supplier images. Additionally, be transparent in your product descriptions about materials and provide clear, reliable shipping and return information to build customer trust.
Beyond initial sales, you should track the attach rate—the percentage of customers who add the test product to their cart—and the AOV (Average Order Value) lift. It’s also crucial to monitor the conversion rate of your core products to ensure the new test item isn’t negatively impacting your existing sales.
Yes, absolutely. Strategically adding accessories like jewelry is one of the most effective ways to increase AOV. By merchandising them as a “complete the look” option alongside your core apparel, you can significantly increase the total value of a customer’s cart with a high-margin, complementary item.
[1] Shopify. (2026). Product Testing: A Complete Guide for Retailers (2026). https://www.shopify.com/blog/product-testing
[2] Think with Google. (2026, January). Marketing predictions & guide for 2026. https://business.google.com/us/think/future-of-marketing/marketing-predictions-guide-2026/
[3] Yotpo. (2025, December 18). 2026 Ecommerce Benchmarks: The Efficiency Imperative. https://www.yotpo.com/blog/ecommerce-benchmarks-2026/
[4] McKinsey & Company. (2025, November 17). The State of Fashion 2026: When the rules change. https://www.mckinsey.com/industries/retail/our-insights/state-of-fashion
[5] Deloitte. (2025, December 17). Q3 2025 Retail & Consumer Trends. https://www.deloitte.com/us/en/Industries/consumer/articles/q3-2025-retail-consumer-trends.html